My First Car: Maruti 800 AC 93 Model


Joined
May 1, 2011
Messages
3,594
Likes
761
Location
Bangalore
Wow nice DIY ! You could have illuminated the blower controls too.

Do post a pic taken at the night so that we can see the illumination. Is the led white or blue ?

I can find 6 warning lamps, does is have the warning for door open and radiator fan ?
 
Last edited:
Thread Starter #302
Joined
Mar 28, 2012
Messages
582
Likes
81
Location
Lucknow
Wow nice DIY ! You could have illuminated the blower controls too.

Do post a pic taken at the night so that we can see the illumination. Is the led white or blue ?

I can find 6 warning lamps, does is have the warning for door open and radiator fan ?

Thanks,
I will illuminate the the blower controls soon. The LED's are white. There are 6 warning lights. The new 3 are for Door, Radiator fan and parking brake. I'll click few pics tonight.
 
Joined
May 1, 2011
Messages
3,594
Likes
761
Location
Bangalore
Thanks,
I will illuminate the the blower controls soon. The LED's are white. There are 6 warning lights. The new 3 are for Door, Radiator fan and parking brake. I'll click few pics tonight.
Cool.. In the pic's I can see that you broke the hazard lamp switch ?

So how have you wired these ? And what about those warning lamp shades (fan, doors etc) did you do it ..
 
Thread Starter #304
Joined
Mar 28, 2012
Messages
582
Likes
81
Location
Lucknow
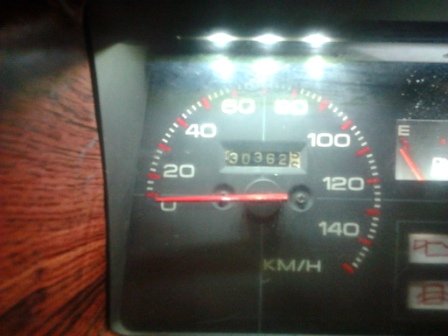
Few pics of the illuminated dashboard.
Photo1325.jpg
Photo1328.jpg
Photo1326.jpg
Photo1329.jpg


Photo1336.jpg
Photo1341.jpg

@ Varun, yes the hazard switch was broken earlier when I removed the meter glass for installing the LEDs. Soon I'll do some jugaad for it.


The LEDs for Oil,Battery and Brake Lamp are soldered to the back plate of the meter console.
A single LED is connected to the central lock circuit for the door warning light.
For the radiator fan warning light, the LED strip -ve is connected to body earth and +ve to the radiator fan +ve.
The Hand brake parking LED +ve is connected to ACC point and -ve of LED strip is connected to the hand brake switch.


For the warning lamp shades, I have removed the original back face plate and made a faceplate using white paper and red pen. The lights are properly visible in day and night time.
 
Last edited:
Joined
Feb 8, 2011
Messages
3,863
Likes
1,169
Location
Chennai
@shantanu, Fantastic DIY. You really understand every part of your car man. Good.


One clarification buddy. Wont that LEDs will be too bright which might irritate your eyes when driving. Very frankly when am seeing in the pics itself it looks very bright for me.
 
Joined
Dec 21, 2012
Messages
104
Likes
21
Location
Jaipur
Hi Shantanu

what type of glue you apply for fixing wood paper. is that heat resistant or not. if not in that case it may release griping with plastic in hot days.
 
Thread Starter #307
Joined
Mar 28, 2012
Messages
582
Likes
81
Location
Lucknow
@ Sethu Sir,
Thanks for liking the DIY. The LED's are not at all irritating the eyes while driving. Only the fuel/temp and speedo lights are lit up. Not the warning lights. The pic was taken from straight level and our eyes are above, so no glare [:)]

@ Robin,
I am using Hexon 800 rubber solution. Its heat resistant and is used to stick roof cloth on M 800 type 1 and also for furniture etc.
 
Thread Starter #309
Joined
Mar 28, 2012
Messages
582
Likes
81
Location
Lucknow
hii is there any rating or model for fog lamps for m 800. What are your fog lamp specifications
Hi,
There is no specific model no. for maruti 800 fog lamps. You can install any design fog lamp in your car. Just take care that the bulbs used are 55W only. If you use 100w bulbs the battery will drain very fast.
 
Thread Starter #310
Joined
Mar 28, 2012
Messages
582
Likes
81
Location
Lucknow
Today, I went to my friend's garage for some work. An OMNI owner was there to get the brakes serviced and I was sent to the market to bring brake oil etc. So I decided to service my brakes also. There are no pics, as my hands were too dirty to use the mobile phone. I removed the rear wheel and hub and cleaned the brake shoes and drum. The front disc & pads were also cleaned and the caliper was thoroughly cleaned using thinner. There was lots of muddy substance in the front caliper pistons and the packing was not in a good condition. The rear brake-bleeding nipples were jammed so I replaced them. And the biggest surprise . . . . There was water in the brake lines and the brake fluid was dark black in colour. I flushed the brake lines twice and bleeded the brakes using 500ml KBX dot 3 brake fluid. The result is great and braking power has increased more than twice. Total Expense Rs 380 {Rs 150 for brake oil Rs 200 for packing kit and Rs 30 for bleeding nipple}
 
Joined
Dec 31, 2012
Messages
36
Likes
0
Location
vijayawada
Hi,
There is no specific model no. for maruti 800 fog lamps. You can install any design fog lamp in your car. Just take care that the bulbs used are 55W only. If you use 100w bulbs the battery will drain very fast.
Got it thanks mr shantanu and one where to fit the fog lamps is it easy. Is there any drilling needed
 
Joined
Dec 31, 2012
Messages
36
Likes
0
Location
vijayawada
Today, I went to my friend's garage for some work. An OMNI owner was there to get the brakes serviced and I was sent to the market to bring brake oil etc. So I decided to service my brakes also. There are no pics, as my hands were too dirty to use the mobile phone. I removed the rear wheel and hub and cleaned the brake shoes and drum. The front disc & pads were also cleaned and the caliper was thoroughly cleaned using thinner. There was lots of muddy substance in the front caliper pistons and the packing was not in a good condition. The rear brake-bleeding nipples were jammed so I replaced them. And the biggest surprise . . . . There was water in the brake lines and the brake fluid was dark black in colour. I flushed the brake lines twice and bleeded the brakes using 500ml KBX dot 3 brake fluid. The result is great and braking power has increased more than twice. Total Expense Rs 380 {Rs 150 for brake oil Rs 200 for packing kit and Rs 30 for bleeding nipple}
ohh your are also a DIY expert like varun
 
Thread Starter #314
Joined
Mar 28, 2012
Messages
582
Likes
81
Location
Lucknow
SUNDAY DIY

Today I was getting bored at home so decided to inspect the high tension coils, clean the air filter and re-paint the air filter housing.

The tip of HT cables before cleaning
Photo1347.jpg

Cleaned the tips by rubbing slowly with sand paper
Photo1349.jpg

One of the spark plug cap is broken
Photo1352.jpg
Photo1353.jpg
But there is no misfiring etc

The second plug cap is not in good condition and is taped
Photo1355.jpg
Photo1357.jpg

The third one is in perfect shape
Photo1358.jpg
Photo1359.jpg

There is a little cut in the wire but no copper conductor is seen.
Photo1360.jpg
Photo1361.jpg

Also cleaned the air filter
Photo1374.jpg
Photo1375.jpg
Photo1377.jpg

Re-painted the air filter housing
Photo1371.jpg
Photo1380.jpg
Photo1381.jpg
 
Last edited:
Top Bottom