DIYs Done On My 2017 Hyundai Creta (1.6L CRDi)


Thread Starter #1
Joined
Dec 29, 2015
Messages
348
Likes
343
Location
Hyderabad
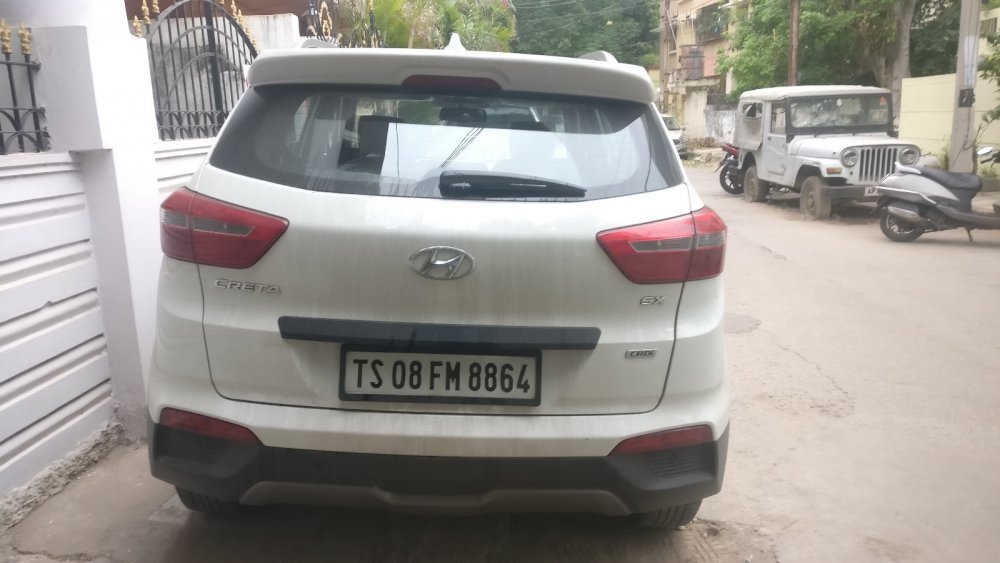
It has been 5 years and 7 months since the Creta came home after selling the older car - Maruti Swift ZDi.

The Creta has clocked 1,24,800 kms so far with no major maintenance works or breakdowns (touchwood!). I along with my friend have done the following DIYs so far on the car. Listed in random order:

List of DIYs/MODS performed:
  1. De-badging of 'SX' & 'CRDi' badges
  2. Auto-dimming IRVM (from AliExpress)
  3. Auto-dimming IRVM from Honda
  4. Number plate garnish - Carbon Fibre wrapped
  5. Addition of rear spoiler - Initially it was body colour but painted it to Black after a while
  6. Brembo Rotors + Pads (OEM Replacement)
  7. Dashcam - initially had the Viofo A119S at the front and the DDPai Mini at the rear. Recently updated the same to Viofo A229 Duo.
  8. Blanking the EGR Valve
  9. Noodle mats
  10. Glove box felt lining
  11. Footwell lighting
  12. Glove box lighting
  13. Hood Gas struts
  14. HID Retrofit - Morimoto D2S 4.0 Stage III kit
  15. Hood Insulation addition
  16. Auto-folding ORVM retrofit
  17. Power window switch illumination
  18. Puddle lamps
  19. LED Swap - Interior lights (Cabin and Boot)
  20. LED Swap - Tail lights + Brake lights
  21. Dual brake light MOD
  22. LED Swap - Reverse Light
  23. LED Swap - HMSL
  24. LED Swap - Indicators
  25. The rear reflector was swapped to LEDs
  26. TPMS addition
  27. Conversion from Drum to Disc brakes
_______________________________________________________

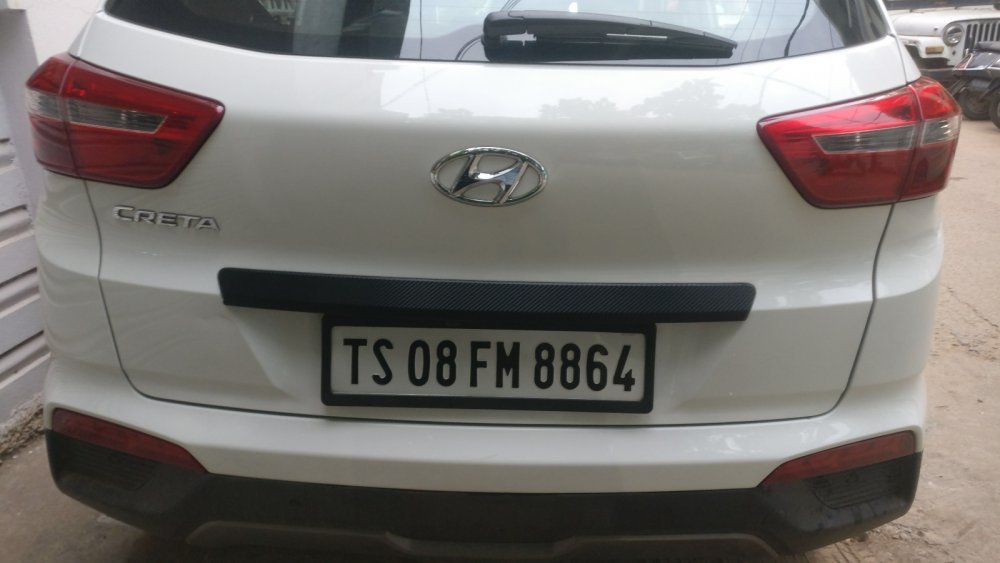
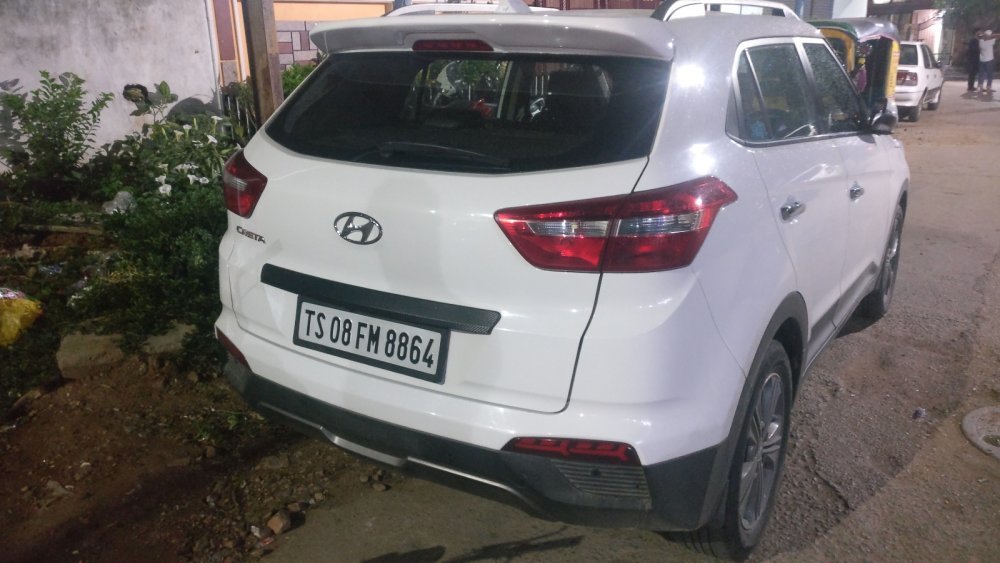
DIY - Debadging: It was one of the simplest DIYs done on the car so far:

'SX' & 'CRDi' badges were removed.
IMG_20190701_175227.jpg

Colgate dental floss
IMG_20190701_192633.jpg

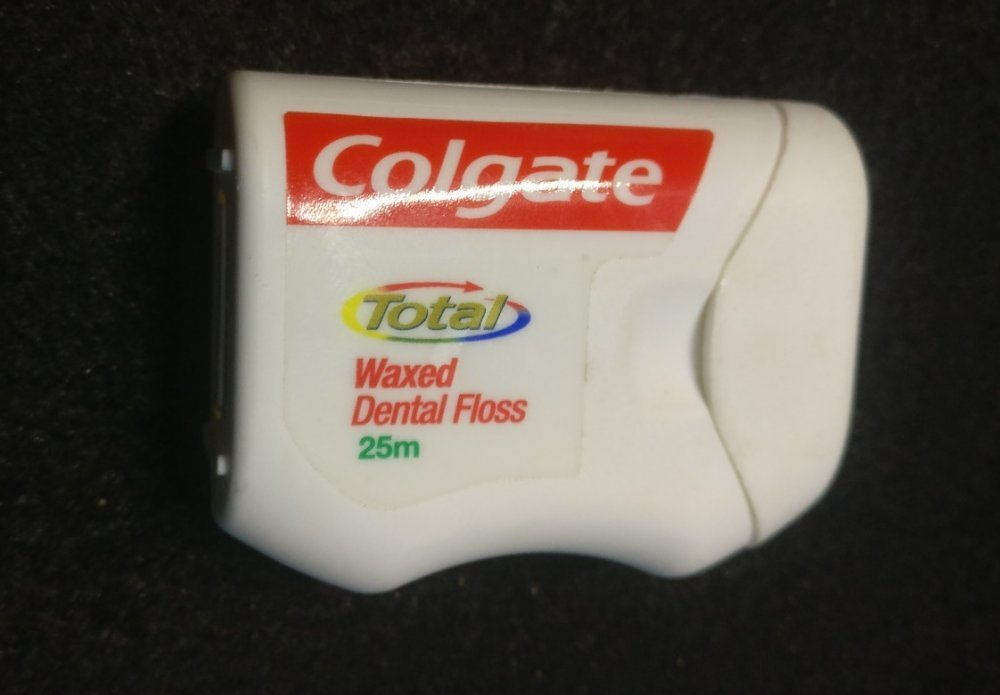
Used dental floss and some muscle power
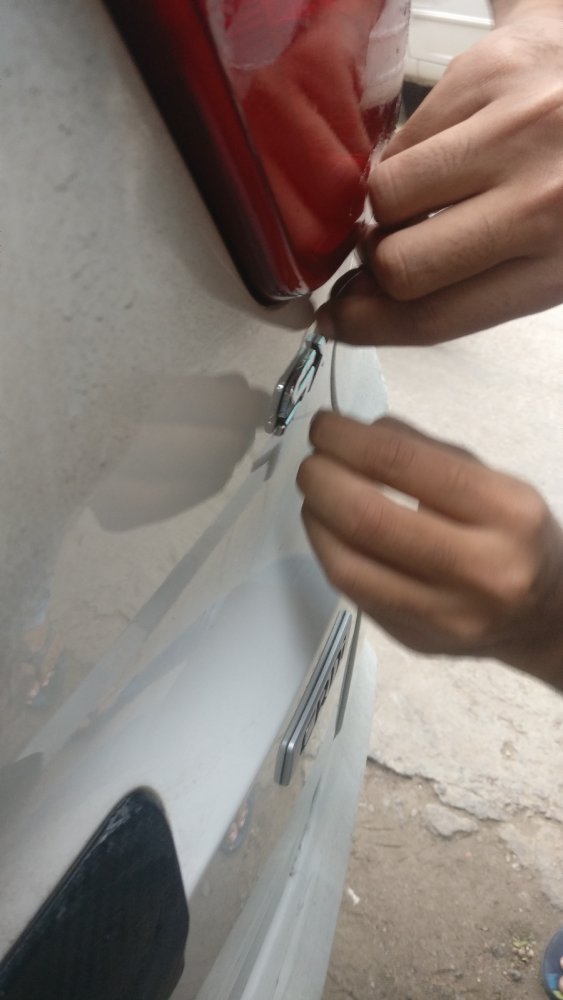
IMG_20190701_175541.jpg
  • After removing the badges, used 100% isopropyl alcohol to remove the residue of the stickers from the body.
Badges removed
IMG_20190701_183419.jpg

Another angle
IMG_20190701_205158.jpg
 
Last edited:
Thread Starter #2
Joined
Dec 29, 2015
Messages
348
Likes
343
Location
Hyderabad
DIY Retrofit - Auto Dimming IRVM (from AliExpress)

I had done this modification in my previous car, i.e., Maruti Swift ZDi, and wanted the same on my Creta, so I ordered it from AliExpress.

What I paid
1. Cost.png
The IRVM, the wire concealer trim and a user manual
2. Package contents.jpg

Stock IRVM - Day/Night flip lever type
3. OE manual IRVM.jpg

Stock IRVM mounted on the windshield
4. Mount on windshield.jpg

Using the Torx bit, remove the screw and pull the IRVM backward to free it from the windshield mount
5. Removal of OE IRVM.jpg

TX-15 bit
5a. Bit required to remove OE IRVM.jpg

IRVM removed, showing the mount attached to the windshield
6. Metal mount stuck on windshield.jpg

The new Auto-dimming IRVM installed
9. New IRVM mounted.jpg

Installed and powered using fuse tap cable
10. Wired and ready.jpg

OEM vs Auto-dimming IRVM
11. A comparo (OE vs New one).jpg

Fuse chosen in the box for powering the IRVM using a fuse-tap cable (low-profile Mini type). Wanted the fuse to be powered ONLY when the ignition is ON
12. Fuse Box.jpg
 
Last edited:
Thread Starter #3
Joined
Dec 29, 2015
Messages
348
Likes
343
Location
Hyderabad
DIY Retrofit - Auto Dimming IRVM (Honda IRVM)

After using the AliExpress IRVM for almost 4.5 years, I got the Honda's auto-dimming IRVM i.e. the one provided as OEM in the 6th generation of the Honda City. Feels premium with no buttons or LEDs on the unit fascia and also mimicking the frameless design of the likes of VW.

I received this as a gift from my close friend (Ashton Raymond) after he had done the exact retrofit in his 1st Gen Swift VXi.

OEM Part Number of Honda
IMG20220612224246.jpg

Part Details + Price
IMG20220612224239.jpg

The IRVM
IMG20220612224307.jpg

Another angle
IMG20220612224314.jpg

Windshield-facing light sensor
IMG-20220614-WA0025.jpg

The windshield mount is similar to what Hyundai provides hence was a direct fit in my car
IMG-20220614-WA0023.jpg

The coupler
IMG20220612224454.jpg

Mounted on the windshield and connected to the power source
IMG20220622171643.jpg

Side angle view
IMG20220622171759.jpg
  • I have been using this IRVM in my car for almost 1 year now and it is one of the best MODS I have done.
  • To be frank, it was crazy for Honda to sell this IRVM at such a low price of just ₹422. It feels so premium and doesn't feel like it was developed for a C-segment car.
  • It is functioning reliably with the auto dimming function on-the-spot.
 
Last edited:
Thread Starter #4
Joined
Dec 29, 2015
Messages
348
Likes
343
Location
Hyderabad
DIY - Carbon Fibre Wrap for the Number Plate Chrome Garnish strip

I prefer minimal chrome on the car so wanted to paint this black but found a cheaper alternative on Amazon India. CF wrapping sheet so bought it and did the same since it was easier and reversible (if required)

OE Chrome Garnish strip
1. Rear Chrome strip - Before.JPG

CF Wrap sheet from Amazon
CF wrap used for the job.jpg

Boot cladding removed to access the screws that hold the chrome garnish strip
Boot lid cladding removed.jpg

The chrome garnish strip removed (got the chance to clean that area which is in-accessible otherwise)
Chrome strip removed from the boot.jpg

Chrome strip placed aside
Chrome strip removed.jpg

Tabs that hold the camera and boot release part on the chrome strip
Tabs that hold the camera part on the chrome garnish.jpg

Screws holding the camera mounting plastic trim
Star screws that hold the camera part.jpg

The reverse camera and boot opening switch were removed from the strip for easy working during the wrapping stage
Reverse camera part removed for ease of work.jpg

Heat gun + knife used
Heat gun and knife.jpg

WIP
WIP.jpg

Wrapped and ready to be refit
Wrapped and ready to be refit onto the car.jpg

Refitting done
IMG_20180918_173047.jpg

Full car view post wrap
IMG_20180918_173041.jpg
 
Thread Starter #5
Joined
Dec 29, 2015
Messages
348
Likes
343
Location
Hyderabad
DIY Retrofit - Rear Spoiler

Just another cosmetic addition, nothing else. While I wanted the rear spoiler, I didn't want to drill holes in the body hence went searching for something that can mount using clamps matching the body colour.

Clamps to mount the spoiler on the boot lid. Additionally, the base of the spoiler has a 3M VHB stickers strip for extra anchoring
Clamps for holding the spoiler.jpg

OE Look
IMG_20180503_053712.jpg

OE Look - Side view
IMG_20180503_053739.jpg

Rear spoiler mounted
IMG_20180529_144833.jpg

Another angle
IMG_20180529_161216.jpg

  • After a while, felt like I needed a change and would be great to repaint the spoiler in 'Black'. Removed it from the car and handed it over to the painter at the FNG which I visit regularly.

Repainted black and refitting done on the car
IMG20201004132641.jpg

Another angle of the rear spoiler in Black
IMG20201004132618.jpg
 
Thread Starter #6
Joined
Dec 29, 2015
Messages
348
Likes
343
Location
Hyderabad
DIY Retrofit - Brembo Rotors + Pads
  • With not-so-great braking, I felt the car needed some better-stopping power. The issue mainly was spongy pedal-feel and improper feedback during braking.
  • Found a reputed seller for Brembo brakes in India (United Motors, Chennai). Ordered the set from them and did the DIY job at the FNG.
  • These are OE replacement with no ground-breaking changes done to the system but after the swap, I felt that the pedal response was better and slightly on the sharper side.
  • While carrying out this modification, the odometer reading was around 18,000 km.

Rotor - 09.A532.20 = OE size for the Creta
IMG_20180503_201520_01.jpg

Unpacked
IMG-20180427-WA0014.jpg

Pads - P 18 025 = These were the first set that I used from Brembo's. They were slightly smaller and not covering the rotor surface fully
IMG_20180503_210254.jpg

Pads with clips
IMG_20180505_023630.jpg

Stanley 1/2" socket set used for the DIY
IMG_20180505_205758.jpg

Raised the car using floor jack first then mounted the jack stands under
IMG_20180506_105544.jpg

Car on the jack stand
IMG_20180506_105531.jpg

OR Rotor and pads
IMG_20180506_110338.jpg

Caliper with bleed screw ahead
IMG_20180506_110531.jpg

OE Pad springs - These are provided by Hyundai so the wear and tear is reduced. The pads move away from the rotor as soon as the pressure is released helping the pad life to be increased
IMG_20180506_110902.jpg

New Brembo rotors installed
IMG_20180506_175956.jpg

With Brembo pads installed
IMG_20180507_111302900x1600.jpg

Spanner and socket handle plus caliper grease
IMG_20210613_153211.jpg

  • During the routine pad change, the seller informed me that there is a new pad for the Creta with the correct dimensions for the rotors that are in use. I purchased the same since it was time for a new set anyway.
  • I ran the OEM pads for ~18,000 kms (P 18 025) after that I bought the replacement pads (P 30 070) when the odometer was at 1,01,618 kms.

New Pads - P 30 070
IMG_20210612_134208.jpg

Old Pads vs New
Old set vs New set.jpg

Old vs New
The pads.jpg

C-Clamp used to push the piston back during pad change
IMG_20210613_161239.jpg

Every ~30,000 kms, I have changed the brake fluid in the car and also greased the caliper pins for longer life. I've used TVS-Girling DOT 4 brake fluid and TVS-Girling caliper grease sachets purchased from Boodmo.
IMG_20180505_205753.jpg
  • Odometer at the time of the above pad replacement was 1,01,618 kms. Pretty happy with the life 83,6xx kms for both city and highway driving cycle.
 
Last edited:
Thread Starter #7
Joined
Dec 29, 2015
Messages
348
Likes
343
Location
Hyderabad
DIY Retrofit - Dashcam
  • I feel this is a must-have accessory in all cars running on our roads for safety reasons. I had the Viofo A119S to record what happens at the front of the car and the DDPai Mini to record what happens at the rear of the car.
  • I purchased both these dashcam's from AliExpress for a great price.

Viofo A119 S - For the front
IMG_20180120_145556_01.jpg

The camera unit - Classic Viofo style wedge shaped
IMG_20180120_145900_01.jpg

Mounted on the windshield, just behind the IRVM
IMG_20180127_014904.jpg

Another angle
IMG_20180127_014919.jpg

DDPai Mini + Hardwiring kit
3. The package with HW kit.jpg

Package contents
4. DDPai Mini package contents.jpg

The Camera unit
7. The camera.jpg

The power wire for the DDPai Mini dashcam
4. Wire coming side to top.jpg

Camera installed on the HMSL cover.
1. Cam fixed on HMSL cover.jpg

Rear camera - View from outside
9. View of the cam from outside.jpg

DDPai Bluetooth remote installed
12. Remote mounted.jpg
  • After selling the two dashcams, I wanted a dual-channel setup rather than having two individual camera's doing the same. It was easier to install and manage. I decided to go with the Viofo A229 Duo.

  • Have a full-blown detailed thread on the DIY. Please check it out.
Viofo A229 Duo + Viofo HK4 Hardwiring Kit + Viofo CPL Filter + SanDisk Extreme Pro (128GB) SD card
1. Viofo A229 Duo + CPL + HK4 + SanDisk Extreme Pro 128GB card.jpg

The front camera unit installed and powered:
19. Front camera mounted and cables connected.jpg

Rear camera unit installed, wiring secured and connected:
20. Rear camera mounted and connected.jpg
 
Last edited:
Thread Starter #8
Joined
Dec 29, 2015
Messages
348
Likes
343
Location
Hyderabad
EGR valve blanking
  • Ordered the blanking plate + gasket set from eBay. It was a direct fit for the 1.6L CRDi engine.
The Kit received
IMG_20180514_192710.jpg

One steel plate with two gaskets to be placed on either side of the metal plate for a proper seal
IMG_20180514_192736.jpg

EGR Valve
IMG_20180327_024736.jpg

EGR Valve coupler disconnected
IMG_20180327_025112.jpg

W.I.P
IMG_20180515_193027.jpg

The location where the blanking was done
IMG_20180515_193612.jpg

Arranging the gaskets before fitting
IMG_20180515_200049.jpg

OEM EGR valve metal gasket
IMG_20180515_200100.jpg

Blanking done
IMG_20180516_031531.jpg
 
Last edited:
Thread Starter #9
Joined
Dec 29, 2015
Messages
348
Likes
343
Location
Hyderabad
DIY - Noodle Mats
  • Since delivery, I was using the fabric mats provided by Hyundai. They were smaller with lesser floor coverage and also prone to getting wet and soiled. Decided to get noodle mats from 3M but they were too costly for the Creta. Hence decided to buy it from the local stores where these are sold in bulk. I purchased a large roll for both my car as well as my DIY partner's car.
Noodle mat roll
The Mat.jpg

WIP - Used the overall shape of the OEM mat. My cutting skills are crude, yes, but it has served the purpose so far.
WIP.jpg

Driver's side
Driver side.jpg

Passengers side
Passenger side.jpg

Rear right passenger side
Behind drivers.jpg

Rear left passenger side
Rear passenger.jpg

Central hump area
Central hump.jpg
  • This a pretty easy and less time-consuming DIY this was. Makes life a lot easier when cleaning the interiors and also helps trap dirt and water during the rainy season.
  • The base of this mat is thick hence doesn't let water or dust reach the actual floor carpet.
 
Last edited:
Thread Starter #10
Joined
Dec 29, 2015
Messages
348
Likes
343
Location
Hyderabad
DIY - Glove Box Felt Lining
  • Having rattles from the glove box is a pretty common problem most users face. To arrest this either that item is to be removed or has to be wrapped so it stays silent. Watching a DIY on felt lining the glove box, I decided to repeat the same on my car's glove box.

Went to the same location where I had purchased the noodle mats for this felt lining. Purchased the whole roll at a great price so we could replicate the same in each of our cars.
1. Roll purchased.jpg

The felt material - Soft and matches the colour of the glove box plus the rest of the dashboard's lower area
2. Fabric.jpg

The whole roll spread out - 27 sqft
3. 27 sqft material.jpg

Glove box full of items
4. Glove box full of items.jpg

Glove box - Emptied
5. Glove box emptied.jpg

Press from outside at the marked location to remove the glove box from the top-stopper bush
6. Press inwards to release and drop down.jpg

Remove the two pins as highlighted to free the glove box from the dashboard
7. Remove the two tabs to free glove box.jpg

The Glove box removed
8. Glove box removed.jpg

Used newspaper to trace out the shape before cutting the felt lining material
9. Using newspaper to make template.jpg

All pieces were placed on the felt lining for tracing out - All sides covered
12. All templates ready.jpg

Tracing done
13. Traced the templates on the felt lining material ready to cut.jpg

The area marked with the chalk to be cut to accommodate the crease in the glove box facilitating to remove it from the top bush
16. Small piece cut to imitate the cut in the top part of the glove box.jpg

Test fitting before glue is applied
17. Test fit all pieces before final trimming and glue application.jpg

Glue was applied and held down using clips overnight
19. Held the edges with clothes hanger clips.jpg

After 8 hours, this is the final outcome
20. All done and left overnight for drying.jpg

Fevicol gum plus the blade used for cutting the felt lining material
Items .jpg

Roller used for even pressure application after glue was spread out
Items 1.jpg

  • After the glove box, the next rattling point is the cup holders. I didn't glue it but cut the shape of the cup holders and placed the felt lining inside it so I can remove the lining and clean it when required
Cup holders - Emptied and cleaned
IMG_20181004_185026__01768x1645.jpg

Cut the felt lining material to the required shape as much as I could and placed the lining inside
IMG_20181004_190733__01768x1537.jpg
 
Last edited:
Thread Starter #11
Joined
Dec 29, 2015
Messages
348
Likes
343
Location
Hyderabad
DIY - Footwell Lighting
  • Another modification that was done for cosmetic purposes that were carried forward from my earlier car. I had access to commercially available footwell lighting sold commonly on Amazon or regular car accessories i.e. the ones with changing light as per music or static which was controlled using a remote.
  • I used only the LED strip casing that was enclosed in a plastic housing with almost weatherproof end connections.

Commercially available footwell lighting
1. Footwell Lighting.jpg

The highlighted part from the kit was NOT used in this modification
2. Part of the kit that was not used.jpg

LED used in this modification - I did carry forward the leftover from my Swift's footwell lighting MOD
2. Wipro Garnet 3528 LED strip.jpg

Chocolate block connector used to connect all 4 individual wires
3. Chocolate block connector.jpg

Used the part for the LED to be stuck inside the cabin
4. Ready to stick strip.jpg

Zip ties
5. Nylon zip ties.jpg

Wire stripper
6. Wire stripper.jpg

Cabin light (equipped with the theatre-dimming feature) - Push to open the sunglass holder to gain access to the screws holding the cabin light
7. Push to open the cabin light.jpg

Remove the screws to free it from the headliner mount
8. Screws to remove.jpg

Two connectors that need to be unplugged - Bluetooth Mic and Light connector
8a. Connectors of the cabin light.jpg

The 'under-side' of the cabin light - Points highlighted on the image where two wires can be soldered for the footwell lighting to work in unison with the cabin light or IF required to be operated individually
9. Underside of the cabin light.jpg

Soldering the wires onto the cabin light
10. Soldering two wires on cabin light.jpg

Soldered and used butt connectors at the other end for easy connection
11. Two wires soldered and crimped other end with buller connectors.jpg

A 'dual-core' wire was fished through the headliner, through the left A-pillar and down to the front passenger footwell where all the wiring would meet. Crimped the butt connectors to the new dual-core wires and connected it to the cabin light
12. Dual core wire crimped with bullet connectors and connected to cabin light.jpg

Now solder the wiring to the individual LED strips
13. Soldering wires to the Wipro LED strips.jpg

  • After soldering all 4 wires individually, we tested them for functioning and once it was as required, we passed all 4 LED strips to the individual casings and routed all the wires to meet near the front passenger side footwell
Driver's side LED strip stuck on the crash pad
14. Drivers side strip stuck.JPG

Front passenger side LED strip stuck under the glove box trim - Doesn't affect glove box operation or get obstructed
15. Passengers side strip struck.JPG

Rear left passenger LED strip stuck to the seat rails - Seat movement isn't a problem
16. Rear left side strip stuck.jpg

Rear right passenger LED strip stuck to the seat rails - Seat movement isn't a problem
17. Rear right side strip stuck.JPG

All 4 wires of individual footwell's meet near the passenger side footwell to get connected to the 'dual-core wire' that was dropped from the cabin light
18. Wires from all sides meeting at the passenger footwell.jpg

Wiring diagram showing the way the connections have been made to accomplish this modification
Untitled.jpg

Images - Lighting output

Driver's side
21. Drivers side strip glowing.JPG

Front passenger side
22. Passenger side strip glowing.JPG

Rear left passenger side
23. Rear left side glowing.jpg

Rear right passenger side
24. Rear right side glowing.jpg

All the lights ON
27. All lights glowing.jpg
 
Last edited:
Thread Starter #12
Joined
Dec 29, 2015
Messages
348
Likes
343
Location
Hyderabad
DIY - Glove box Lighting

  • Since the wiring was ready and routed in place thanks to the 'footwell lighting' modification done earlier, this minor modification was easy to be done. I used the same LED strip that was left over just enough for this modification.
  • I wanted the illumination to work ONLY when the glove box was opened and NOT always ON type hence used a small 'Push-to-OFF' type switch inside the glove box to activate the LED.

2-pin Push to OFF switch
1. Push to OFF switch.jpg

Wiring prepared outside and tested before connection and routing
2. Wiring.jpg

There is a rubber grommet in place that I removed and mounted this switch. The glove box lid pushes the switch inwards to turn OFF the LED
3. Switch in my Creta.jpg

LED in action
5. Creta's glove box illuminated.jpg
 
Last edited:
Thread Starter #13
Joined
Dec 29, 2015
Messages
348
Likes
343
Location
Hyderabad
Gas struts for the Hood
  • This was the first modification done on the car as soon as I got it in hand. Pretty straightforward as it was a 'plug and play' type.
  • Since the Creta is sold in Russian markets with the name ix25, getting accessories was easier when eBay and AliExpress were functional and shipping to India without any issues.

Ordered on eBay
7. Price paid.jpg

The packing
1. The packing.jpg

The pair of Struts
2. The Struts.jpg

Bottom clamps
3. Lower clamp.jpg

Top clamps
4. Upper clamp.jpg

M8 studs and fasteners
5. M8 Ball studs and nuts with their washers.jpg

Undo the bolt (marked in the image) to mount the top clamp
8. Unscrew the bolt to mount the top clamp.jpg

Undo the bolt and black screw to mount the bottom clamp
9. Unscrew the two bolts to mount the lower clamp.jpg

Top clamp added
10. Top clamp mounted.jpg

Bottom clamp added
11. Bottom clamp fixed.jpg

M8 stud added to the top clamp
12. Ball stud fixed to the top clamp.jpg

M8 stud added to the bottom clamps
13. Ball stud fixed  to the bottom clamp.jpg

Strut connected to the bottom clamp
14. Strut fixed to the bottom clamp.jpg

Strut connected to the top clamp
15. Strut fixed to the top clamp.jpg

Hood in service position with the help of the struts - Close up
17. Both struts - Close up.jpg

Hood is held in the service position with the help of the struts
16. Hood held up by the struts.jpg

As highlighted in the image below, the part of the foam has to be cut since the strut body rests there when the hood is closed
Screenshot_20171004-033340.jpg
 
Last edited:
Thread Starter #14
Joined
Dec 29, 2015
Messages
348
Likes
343
Location
Hyderabad
Hood Insulation
  • Another cosmetic addition that serves no major purpose to the performance of the car. I wanted to address the 'bare' look when the hood was raised. Hyundai could at least provide some kind of insulation under the hood at least for cosmetic sake but Hyundai being Hyundai decided to leave it exposed. Not a deal breaker but doesn't look 'eye-pleasing' when the hood is up. Thanks to AliExpress, I got this part for a decent price.

The packaging for the hood insulation
1. Packing.jpg

The hood insulation
3. Insulation pad.jpg

Fasteners provided in the package
4. Fastener Screws.jpg

The Insulation - is spread open on the engine bay
5. Insulation sheet spread flat.jpg

Hood side layer
6. Underside of the insulation sheet.jpg

Holes in the hood where the fasteners will be inserted to hold it down
7. Holes on hood for insulation.jpg

Holes pre-drilled in the insulation matching the holes on the hood
8. Pre-cut holes matching on the hood.jpg

Before installation
11. Before installation.jpg

After the installation of the insulation
12. After Installation.jpg

Fastener close up holding the insulation to the hood
13. The screw type fastener.jpg
  • I have removed that aluminium sheet that was stuck and kept it bare and uniform.
  • It has been well over 5 years and 1,00,000+ kms with this insulation installed in the engine bay. No issues or sagging problems I have encountered so far.
 
Last edited:
Thread Starter #15
Joined
Dec 29, 2015
Messages
348
Likes
343
Location
Hyderabad
ORVM - Auto Folding
  • Wanted this function from the factory but Hyundai never gave it in the initial years of Creta so I decided to add it myself with the help of a plug-and-play kit.

KMH Brand - Auto folding relay kit for Creta
1. Mirror Folding Relay Package.jpg

Drivers side door pad - Needs to be removed for relay installation
2. Front door pad.JPG

Door pad removed
Door pad removed.jpg

Close up
Close up of door internals.jpg

Added two Scotch lock connectors as recommended in the installation manual
Connected as instructed using scotch lock.jpg

ORVM coupler connected to the relay box
Connector plugged in.jpg

Relay box mounting position - Should not obstruct the closing of the door pad when refitting
Relay box mounting on body.jpg

All wires were neatly secured and the relay box was mounted in position using 3M VHB tape
Relay mounted and scotch lock connector taped.jpg
 
Last edited:
Top Bottom