Hello friends,
I was really bored with the self stitched cotton seat covers and whenever I see other peoples car seats, I wished to get myself one too. Finally it was possible now.
![Big Smile [:D] [:D]](https://www.theautomotiveindia.com/forums/images/smilies/Big%20Smile.gif)
Here you go:
Product Name and Link:
PU Leather aka leatherlite Seat Covers
Product Cost: Rs. 4,440 (Excluding Ebay Discounts) but seller has now increased the price to Rs. 4,775.
Seller Details: Vicky Khanna, Khanna Enterprises, Ghaziabad, UP.
Product Review: I was in touch with this seller past many days, asking the quality, pricing and custom designs but now it was the time to decide and buy. I had already visited few local car shops before but they were quoting 5-6k and pu leather is unknown and stitching takes a week after ordering.
I placed the order in the late night and sent snapshots of sample seat covers of my liking. Next day morning, seller called me to get in touch on whatsapp (Actually I'm a anti-whatsapp person

but I installed it!) and he confirmed my requirements. Vertical stripes, beige color with black piping in the edges. Somewhere between 4-5pm, I asked him whether he can show any of stitched covers but to my surprise, he showed me packed parcel and said, the covers are ready and will be dispatched in few. I was amazed by how fast they were able to stitch the covers, within 6 hours. In the evening it was shipped but through Trackon, a worst courier I have experienced many times. Took nearly a week and it reached local office but it wasn't delivered to me, I got a call next telling me we were not able to deliver today either but will try tomorrow. Actually there intention is get to the package myself so they can save fuel and work. It happens every time I get parcels from Trackon. I bring it myself but its not near either.
Anyway, the covers were really awesome. Excellent quality PU leather, thick material and perfect stitching. Design is exactly same as I requested. Seller has two types of qualities, one is normal range which is made of 14mm foam and the other is luxury range (aka custom fit) that is made of 16 mm high density foam and very good quality leatherite which is better then normal. I bought the luxury range which costs 1k more then normal.
Yesterday morning I started to install the new covers myself. First I fitted the front seat covers and removing seats was not required but it was little hard because of tight and thick covers. However, it was not possible to fit covers over rear seats because the seat has to be removed and that was not possible for me. I couldn't find info over internet about rear seat removal of Honda City 3rd gen. In civic and some other cars, there are two bolts under each seat belt locks but I couldn't find such. Asked to akash1886 but he had removed the seats many years ago and couldn't remember now. So only possible way was to get the seat covers fitted in local car shop.
Today I went to a known car shop and they were able to fit the rear seat covers it in 30 mins but due to there fast working character, the covers where not fitted to my satisfaction but now that I have learnt, will fit it again properly. Cost for fitting was Rs. 400.
Seller feedback: Very friendly communication. Fast response over Email, Whatsapp and SMS. Prompt service as well.
Product Snapshots:
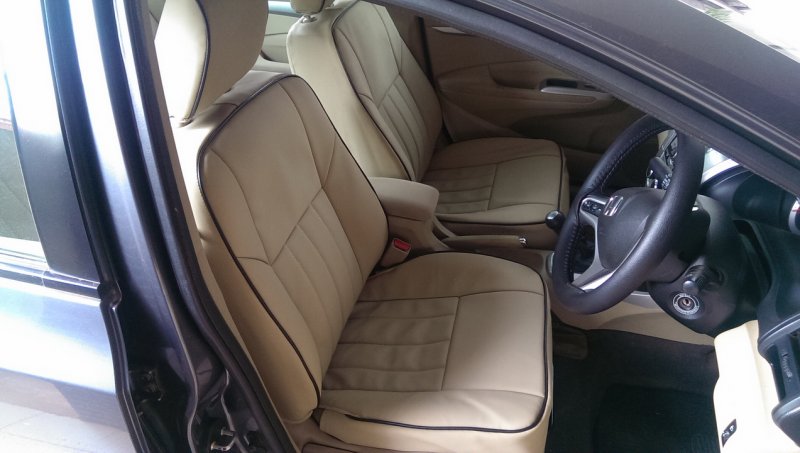
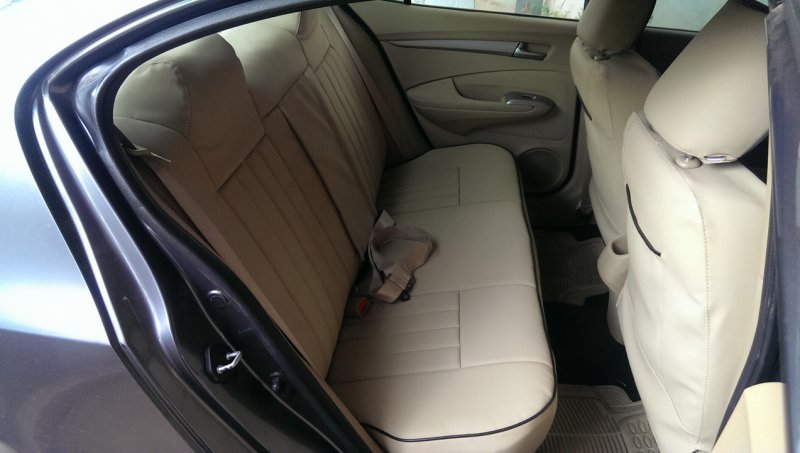
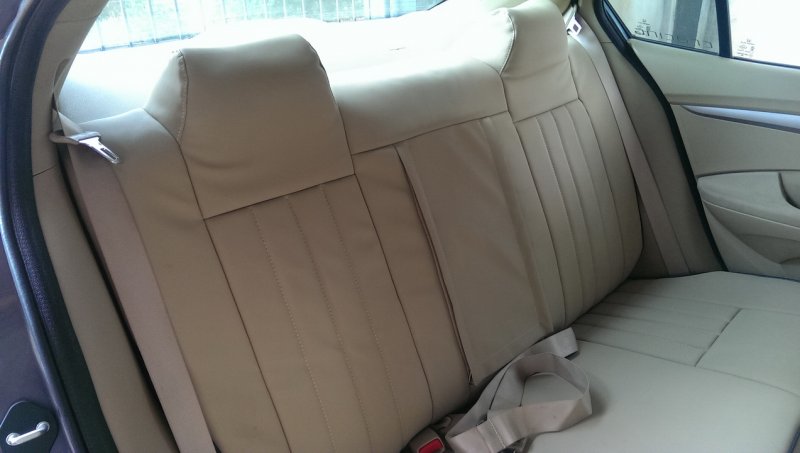
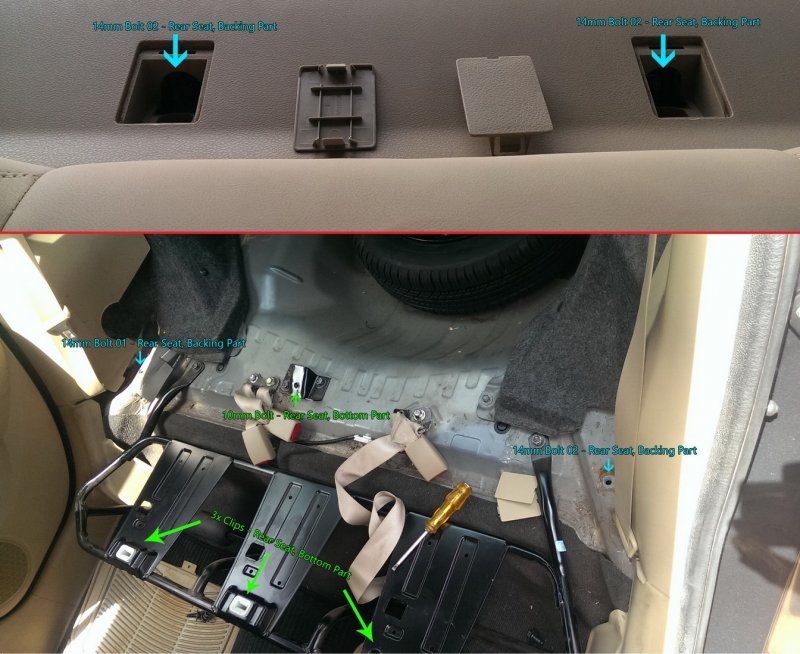
Instructions on how to remove rear seat of Honda City 2009-2013 (3rd Gen)
1. First you'll need to remove the bottom part of the seat. There are three clips and one bolt. The bolt is located in the center of two seat belt locks. Its very tight to reach there but possible. You need a 10mm socket spanner to remove that bolt. Check the attached picture and you'll understand the locationsd. Green color markings.
2. Next is to pop up the seat upwards. There are three clips holding the bottom seat. Left, Right and Center. Just pull the seat up and it will unplug. You can look under the seat to view the clips.
3. Once the bottom seat is removed, its not hard to remove the back seat. In the bottom there are two 14mm bolts left and right, next to seat belts. They can be easily removed using a spanner. Other two 14mm bolts are in the top, hidden under plastic cover. Pop the plastic cover using flat screwdriver (Tapped) and remove the 14mm bolt using socket spanner of 14mm. Check the attached picture and you'll understand the locations. Blue color markings.
4. After you remove all the 4 bolts, The back seat should come out. If not, just pull upwards and it will. Note; the seat will be heavy because its frame is attached to it (Unlike bottom seat) so take it out careful with the help of another person.
To assemble just follow steps backwards.
Thanks...
Best Regards


![Big Smile [:D] [:D]](https://www.theautomotiveindia.com/forums/images/smilies/Big%20Smile.gif)
 but I installed it!) and he confirmed my requirements. Vertical stripes, beige color with black piping in the edges. Somewhere between 4-5pm, I asked him whether he can show any of stitched covers but to my surprise, he showed me packed parcel and said, the covers are ready and will be dispatched in few. I was amazed by how fast they were able to stitch the covers, within 6 hours. In the evening it was shipped but through Trackon, a worst courier I have experienced many times. Took nearly a week and it reached local office but it wasn't delivered to me, I got a call next telling me we were not able to deliver today either but will try tomorrow. Actually there intention is get to the package myself so they can save fuel and work. It happens every time I get parcels from Trackon. I bring it myself but its not near either.


![Roll Eyes [roll] [roll]](https://www.theautomotiveindia.com/forums/images/smilies/Roll.gif)
![Smile [:)] [:)]](https://www.theautomotiveindia.com/forums/images/smilies/Smile.gif)
![Cheers [cheers] [cheers]](https://www.theautomotiveindia.com/forums/images/smilies/Cheers.gif) Eager to see the pictures of your car.
Eager to see the pictures of your car.![Sad [sad] [sad]](https://www.theautomotiveindia.com/forums/images/smilies/Sad.gif)
