Skil 9080 Car Polisher - Review


Thread Starter #1
Joined
Oct 12, 2012
Messages
1,166
Likes
1,330
Location
Hubli
Hello friends,

This is my first thread in product reviews section and here I am with a new product. The Skil Car Polisher Model 9080.

For more then two years, I have been polishing and waxing my car by hand and each time I wished for a machine. Stress or elbow grease is not an issue for me rather I'ed enjoy detailing car but perfection is what I really wanted. By machine, we can make full use of detailing products and get the job done quickly. In this festive session, I was able to buy this machine and I hope to get better results hereafter. However, I have already polished and waxed my car this month so I have to wait for next schedule to try this machine. Review of the product is written below and snapshots are placed next.

> Product Name and Model: Skil 9080 Car Polisher

> Product Price: Approx Rs. 4000 with discount coupons.

> Bought From: Tolexo - Hans Raj Om Parkash, Delhi

> Your Initial Impressions: Product doesn't feel like flimsy or lacks power. Quality of the product is superior and fit, finish is also good. Nothing surprising because I have purchased few other Skil power tools so I know their quality and performance. Actually I'm a fan of Black + Decker and have plenty of woodworking power tools of that brand but they don't make car polishers so I had to go for Skil brand. Bosch subsidiary it is and service center is near to me.

> Your Likes:

- I like the design, rubber coated handle for better grip, and 6m power cable which is enough to reach all car body panels.
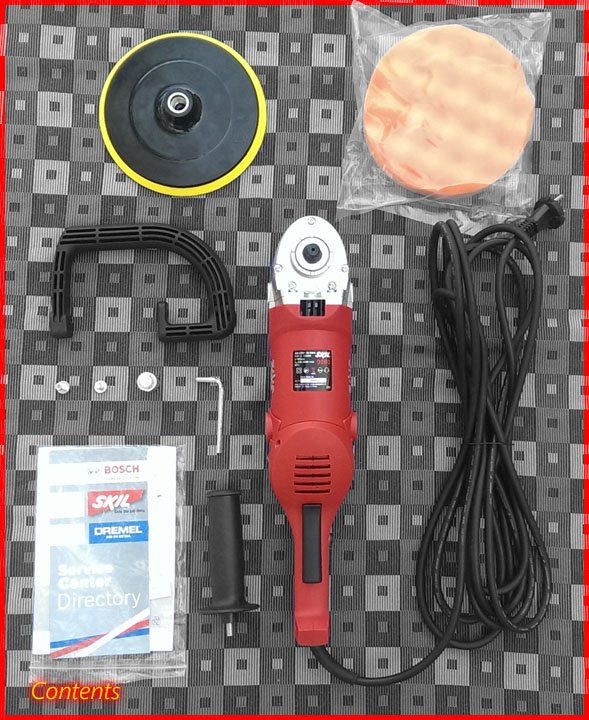
- Metal body and accessories (i.e Allen key, Nuts and Adapter) have thick anti-rust coating.
- Auxiliary and D handles are made of solid plastic.
- Quality of included polishing pad feels good but I'm not so sure because I haven't tried it nor bought any superior quality pads like Lake Country to compare.
- Last but not least, noise level is acceptable till 2 - 3 speeds but above that, its better to use ear plugs.

> Your Dislikes:

- Speed dial has no numerical markings. Previous model (9070) had numbers from 1 to 5 but this one has thin marks to thick marks (Line like) starting from Min which is 600 rpm and ends with Max which is 3000 rpm.

> Value For Money Rating: 10/10

> Sales and Service Support Rating: 10/10

> Overall Satisfaction Rating: 8/10

> Additional / Miscellaneous Points:

- 7 inch backing plate provided in-the-box would be difficult to use on car panels. 4 or 5 inch would be better.
- Provided polishing pad is 7 inch, exact size of backing plate so should be careful when buffing near panel edges.
- Machine is little heavy to handle for prolonged usage, especially on vertical panels.
- M16 Adapter provided is very light weight, feels like plastic with chrome coating. Even the allen key is heavier then that. It wouldn't be useful for me though.
- Could have provided wool buffing bonnet, like the one comes with Skil 9082 Vertical Car Polisher. However, I will be using foam sponge for all my detailing work because wool is aggressive.
- Previous model (9070) used to come with carry bag which isn't given for this newer model.

Snapshots:
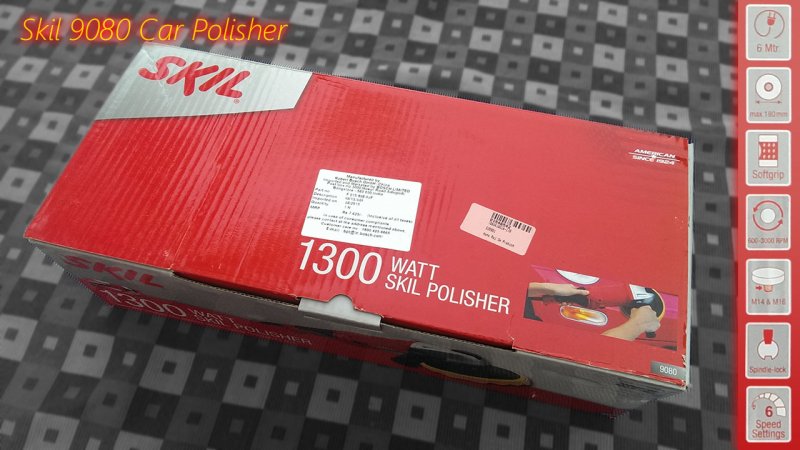
Skil_9080_Box.jpg
Skill_9080_Contents.jpg Skill_9080_Details.jpg

I also dedicate this thread for car polisher discussions and also if anyone owns car polishers, you are welcome to write reviews of it, including safety and usage tips.

Thanks...
Best Regards
 
Last edited:
Joined
Nov 5, 2015
Messages
1,253
Likes
686
Location
NCR
Nice review.

Are there any cheaper alternatives available for polishing? I would like to try on a cheaper product first (can sacrifice on quality) and move to these expensive ones later on.
 
Joined
Aug 6, 2011
Messages
6,206
Likes
4,220
Location
Meerut, U. P.
I have ordered a Bosch polisher on 26th itself and I will reach my home in 3-4 days. But in my case I had to buy buffs individually as the polisher package has only polisher.
The items will reach my home in the hands of my chauffy and then only I will get the feedback.
 
Thread Starter #4
Joined
Oct 12, 2012
Messages
1,166
Likes
1,330
Location
Hubli
Nice review.

Are there any cheaper alternatives available for polishing? I would like to try on a cheaper product first (can sacrifice on quality) and move to these expensive ones later on.
You can find some unfamiliar brands of Chinese or Indian made starting from 2.5k in ebay India and Tolexo but I wouldn't recommend them. Actually this is the cheaper one you can find in good quality car polisher and later you can move to expensive ones.

Someone suggested me KZUBR car polisher listed in ebay India inwhich seller states its Russian made but I found it to be Chinese copy of Zubr power tools.

Another one is Cheston car polisher listed in Flipkart and costs approx 3.5k. It is Indian made and has good ratings but I did not like its built quality. No service center in my city either.

I have ordered a Bosch polisher on 26th itself and I will reach my home in 3-4 days. But in my case I had to buy buffs individually as the polisher package has only polisher.
The items will reach my home in the hands of my chauffy and then only I will get the feedback.
Thats good. Can I know from where have you ordered and model of it? And do you have experience with car polishers or newbie like me?

Yes, you need may to buy smaller backing plate and pads. All car polishers come with 7 inch which is big to use.

I have inquired china made 5" backing plates and 5" polishing pads from one of seller in ebay India. His pricing was 350 and 290 respectively for single piece. In aliexpress I found 8pcs set (1 backing plate, 6 Pads and 1 Wool) for Rs. 500 so I ordered the same. [:D]

Polishing pads from international brands like Lake country, Meguiars are expensive here but serves for long. I will buy one after getting 5" backing plate.

Also note: If you have 5" backing plate then you need use 5.5 or 6 inch pads so you'll be safe in panel edges.
 
Last edited:
Joined
Nov 5, 2015
Messages
1,253
Likes
686
Location
NCR
You can find some unfamiliar brands of Chinese or Indian made starting from 2.5k in ebay India and Tolexo but I wouldn't recommend them. Actually this is the cheaper one you can find in good quality car polisher and later you can move to expensive ones.

Someone suggested me KZUBR car polisher listed in ebay India inwhich seller states its Russian made but I found it to be Chinese copy of Zubr power tools.

Another one is Cheston car polisher listed in Flipkart and costs approx 3.5k. It is Indian made and has good ratings but I did not like its built quality. No service center in my city either.


Thats good. Can I know from where have you ordered and model of it? And do you have experience with car polishers or newbie like me?

Yes, you need may to buy smaller backing plate and pads. All car polishers come with 7 inch which is big to use.

I have inquired china made 5" backing plates and 5" polishing pads from one of seller in ebay India. His pricing was 350 and 290 respectively for single piece. In aliexpress I found 8pcs set (1 backing plate, 6 Pads and 1 Wool) for Rs. 500 so I ordered the same. [:D]

Polishing pads from international brands like Lake country, Meguiars are expensive here but serves for long. I will buy one after getting 5" backing plate.

Also note: If you have 5" backing plate then you need use 5.5 or 6 inch pads so you'll be safe in panel edges.
I am getting a Coido Polisher for 620 bucks on PayTM after cashback (without cashback it is for 850 bucks). Is Coido a good brand? I will let you know the model number if needed, AFAIK it is the lowest range of Coido Polishers.

It has 12v Accessory socket plug and will take power directly from car accessory socket. Any drawbacks of this? (Except that I will have to start the car for some time to prevent battery drain)

I am thinking of going ahead with this one only and will move to expensive ones if needed, as I am not much into car care.
 
Thread Starter #6
Joined
Oct 12, 2012
Messages
1,166
Likes
1,330
Location
Hubli
I am getting a Coido Polisher for 620 bucks on PayTM after cashback (without cashback it is for 850 bucks). Is Coido a good brand? I will let you know the model number if needed, AFAIK it is the lowest range of Coido Polishers.

It has 12v Accessory socket plug and will take power directly from car accessory socket. Any drawbacks of this? (Except that I will have to start the car for some time to prevent battery drain)

I am thinking of going ahead with this one only and will move to expensive ones if needed, as I am not much into car care.
No, please don't buy it. It's total useless product.

The product runs fine in no load but when put on surface, it loses power and reduces speed. 12v would not be sufficient for polishing, even if we keep running car. It gets heated quickly and die soon.

Think of unbranded Chinese drill machine which struggles to make holes.

Also you should careful about which polishing pads to use. Wool pads usually come with cheap polisher can make swirls easily because wool is aggressive and best used with DA.

Its good to invest in quality products or stay with manual process until we can.
 
Joined
Nov 5, 2015
Messages
1,253
Likes
686
Location
NCR
No, please don't buy it. It's total useless product.

The product runs fine in no load but when put on surface, it loses power and reduces speed. 12v would not be sufficient for polishing, even if we keep running car. It gets heated quickly and die soon.

Think of unbranded Chinese drill machine which struggles to make holes.

Also you should careful about which polishing pads to use. Wool pads usually come with cheap polisher can make swirls easily because wool is aggressive and best used with DA.

Its good to invest in quality products or stay with manual process until we can.
Manual process it is for me then! [:)]

My car is already 6 years old and has a good sheen through regular wash and wax. I will stick to manual process only as I have planned many other things for which I need to save money.
 
Thread Starter #8
Joined
Oct 12, 2012
Messages
1,166
Likes
1,330
Location
Hubli
Manual process it is for me then! [:)]

My car is already 6 years old and has a good sheen through regular wash and wax. I will stick to manual process only as I have planned many other things for which I need to save money.
I thought you were detailing your new car. I'd already let you know if it was a good product but actually it has pretty bad feedbacks.

Anyway, a 6 year old car needs complete detailing starting from clay. Manual process would be difficult but not impossible. You can also get complete detailing from 3m and then you can continue with waxing yourself.
 
Joined
Aug 6, 2011
Messages
6,206
Likes
4,220
Location
Meerut, U. P.
What I have ordered is called Bosch-Skil F015.908.0JF vehicle polisher from flipkart for 5600 bucks.
After having gone through the itsem you bought and what I have ordered; I am getting a gut feeling that I am also gonna get the same thingy for a higher price and on the name of Bosch.
 
Thread Starter #10
Joined
Oct 12, 2012
Messages
1,166
Likes
1,330
Location
Hubli
What I have ordered is called Bosch-Skil F015.908.0JF vehicle polisher from flipkart for 5600 bucks.
After having gone through the itsem you bought and what I have ordered; I am getting a gut feeling that I am also gonna get the same thingy for a higher price and on the name of Bosch.
Hello Vipul Ji,

F015.908.0JF is isn't actually a model number of the product but an internal part number may be. However, it is the same make and model I have bought and reviewed here. Skil 9080

Skil_9080_Label.jpg

Of course it is manufactured by Bosch but labeled as Skil and color of power tools will be Red. Actual Bosch labeled tools will be dark blue in color. i.e This Bosch GPO 12 CE costs 8k

5600 bucks is too much for that. If there is possibility to cancel the order, please do so.

The same can be bought from paytm which is listed for 5600 but you get 40% cashback so Effective Price Rs 4100.
Industrybuying, Snapdeal has listed for 4.8k without any coupons.
I will also look for more websites for best price.
 
Last edited:
Thread Starter #12
Joined
Oct 12, 2012
Messages
1,166
Likes
1,330
Location
Hubli
Seems like it's good product. I will also place order in tolexo any links or current price available?
Sorry to say this but Tolexo has increased the price now. With a max coupon of 15%, product will cost 5k. The problem with Tolexo is, they charge tax above listed price.

Here is the link and the coupons are VCTX15 and CDEKHOTX15

In my previous post I have given links for best priced listings, you may have a look.
 
Last edited:
Thread Starter #13
Joined
Oct 12, 2012
Messages
1,166
Likes
1,330
Location
Hubli
Hello Friends,

Yesterday I have spent my whole day learning and understanding about rotary polishers, pads and how to properly use them. I have gathered some information and would like to share with you all. Kindly note, these information are taking from popular detailing websites and forums that I believed to be helpful. They are not written by me nor I have experience with the rotary machine yet. However, I have understood lots things and I'm confident that I can handle it. Credits are fulfilled in the end.


ABOUT CAR POLISHERS

What I have came through is, beginners or those who are new to machine polishing should not be starting with rotary polishers. The drive unit used in a rotary machine is referred to as a direct drive. What this means is the auger, (the threaded part to which the backing plate attaches), is driven directly off the electric motor. This results in a powerful rotating motion. Because the rotary buffer is a direct drive machine, it can do a lot of work very quickly. By work means, the rotary buffer will remove paint.

The rotary can be used as a very effective tool for paintwork correction. In the wrong hands it can produce spectacularly poor results as we all too often see! At best swirl marks and holograms can be imparted and at worst burn through or destruction of painted panels. The latter is fortunately rare and the rotary operator has to ignore clear warning signs for this to occur. Using a rotary buffer correctly requires skill, good technique, and experience. Don't expect or even try to learn how to use a rotary buffer on any vehicle that is important to you. Instead, find an old junker, or go to a wrecking yard and find the hood off a junked car to learn and practice on.

Now for the beginners or newcomer, there are machines called Dual-action polishers and Orbital buffers. The motors and drive units on these two types of polisher's oscillate in an eccentric circular motion. This type of motion is much safer to the paint because it's virtually impossible to apply too much concentrated pressure in one place at one time. Chances are good that when too much pressure is applied, the oscillating action will come to a stop thereby protecting the finish.

Because these types of machines oscillate instead of rotate, they will not instill the dreaded buffer swirls or holograms into your finish as long as you use the appropriate chemicals, buffing pads and bonnets. This safety feature makes these machines highly popular with enthusiasts who would like to use a machine but at the same time, are afraid of burning or inflicting swirls into their car's finish.

Dual-action polishers and Orbital buffers do not have an aggressive enough action to remove small particles of paint in an effort to remove most defects, including sanding marks. This is the same reason Dual-action polishers and Orbital buffers are safe… they don’t have an aggressive action, thus they are safe. However, because they are safe (do not have an aggressive action), they are not aggressive enough to remove all but the finest of scratches.

Do not purchase a dual action polisher or orbital buffer hoping to use these to remove major or even minor scratches, as they are just not aggressive enough. They can often be used to remove fine or shallow scratches and swirls, but they will not remove any scratch that is deep enough to place your fingernail into.

Orbit_vs_DA_vs_Rotary.jpg

Lets compare polishers vs manual process

* Depending on the procedure, machines are nearly twice as fast as your hands.

* Machines are much less fatiguing to your hands, arms, and back.

* Dual-Action Polishers and Orbital buffers apply a thinner coat that's easier to wipe off.

* Dual-Action Polishers and Orbital buffers spread polishes and waxes more evenly, for more uniform results.

* Machines do a better job of cleaning deeper and removing surface defects and oxidation more thoroughly.

* Machines are better at removing swirls.

* Machines force more polishing oils into the surface, for deeper gloss and reflections.

* Machines are more effective at removing serious defects than your hand.

HOW TO USE ROTARY POLISHERS
This is not a complete guide - that only comes from practice.

First things first, always wear safety goggles, respiratory mask, ear plugs before using power tools.

1. Spend time centering the pad on the backing plate of the rotary – spin it at a low speed such as 600 rpm to ensure it is properly centered. Higher speeds can give the illusion the pad is centered as the centrifugal forces force the foam out slightly making it appear more central.

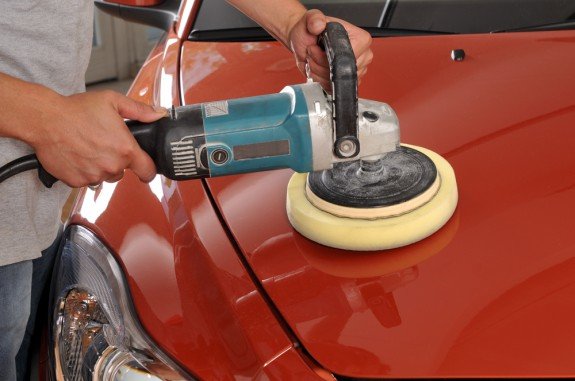
2. For a right handed user hold the handle of the rotary in the right hand and then hold the auxiliary or D handle with the left hand as seen below:

Handling_Car_Polisher.jpg

3. The rotary should be moved with the right arm and the left hand should only be used to hold the head to the paintwork and apply little or no pressure. Practice one handed to ensure you are using the right arm to move the polisher.

4. The rotary should be moved from left to right in an arc. By moving it to the right it naturally moves upwards. By moving to the left it naturally arcs downwards. With practice this arc movement will become second nature. The arm should move slowly and smoothly keeping the pad flat to the paint at all times. On curved panels this isn't possible so more focus on smooth non jerky arm movements is essential.

5. Spray a dry pad with detailers spray or QD and work it onto a panel until the pad is warm and slightly moist!

6. Only apply very small amounts of polish. Some polishes like Menzerna Ceramiclear are very well lubricated and take a long time to break down so only a tiny amount is needed. Apply the small amount in a cross shape on the pad but only very thin lines and a 20 pence size amount is ample to prime the pad with even smaller amounts needed afterwards.

7. Pressure. How much pressure to apply to the head of the polisher is difficult to say a text document and will vary according to defects. For those DA polisher users coming to a rotary the amount of pressure needed is far less than you might apply with a DA polishers or orbital buffers . The rotary can for the most part work under its own weight or very light pressure from the left hand. stubborn swirls may need more pressure again something that will come with experience.

8. Clean the polishing pad regularly! Ensure any dried polish is removed by spinning it at 1500rpm and placing a toothbrush or megs triple duty detail brush across the foam pad. If working on single stage paint and the pad becomes clogged with dead paint so spray the pad with lots of QD and then spin at 900rpm placing an old microfiber against the pads surface to take away the dead paint. Also change pads regularly.

9. Get comfortable!! If you are uncomfortable you will not be able to fully focus on the job in hand! When working on side panels a kneeling stance is more stable than crouching so a soft piece of foam or something similar to support the knees is essential.

10. When working on side panels and curved panels the left hand will need to support the head of the polisher and press the pad firmly against the panel. More pressure will be needed here as the pad won't have the weight of the polisher over it. Again move the polisher in arc like strokes.

11. Painted plastics i.e bumpers. You have to more careful here. Plastics just will not cope with the heat produced like a metal panel can. Indeed if you 'over cook' the painted plastic the surface will wrinkle up! Once the plastic reaches a certain heat it will wrinkle up without warning and very fast! This is irrecoverable! My advice is to test this on a plastic scrap pane so you can gauge the amount of beans you can give it. On real cars stop after each pass and allow the plastic to cool (this takes ages) before attempting another pass! Plastics should not be allowed to get any warmer than luke warm whereas a metal panel can get as hot as you can safely touch with no adverse effects.

12. Working close to plastic moldings (i.e doors, trunk) can be tricky to fully remove swirls. Its better if you can take these off before going through. If not, tape off and try tilting the pad so that more pressure is applied close to the edge with the edge of the foam pad doing some of the polishing work. This may impart holograms so as a final pass go back over with the flat of the pad.

13. Paint is thinner at the edges of panels so care must be taken. If polishing across edges (such as on a car bonnet where the line of the bonnet meets the front wings) then tape off the edge of the panel not being polished. Alternatively lift the bonnet up and have someone hold it so you can confidentially polish up to the edge without running over the edge of the front wing.

14. Don't try and de-swirl too large an area at once. I typically divide a bonnet into 6-8 sections. However once de-swirled and onto the finishing polish much larger sections can be done at once for example a whole door or half a bonnet.

How to use speed setting

1. Spread the polish at low speed (600rpm) > This just spreads the polish around so that it is ready to work, you can see the residue of the polish is cloudy and very obviously "on the paint"

2. Now, raise the speed to medium or 1200rpm > This begins to work the polish and starts the cutting process to remove the paint defects.

3. Medium to high speeds (1500 - 1800rpm) > This is where the lion's share of the work is done defect removal wise. The main cut of the polish is used by around ten passes at these speeds to thoroughly work the polish and get the best cut possible. The abrasives are breaking down all the time during this and the cut getting less and less, so while the defects are being removed, the finish achieved is getting better and better as the process goes on. After this, the residue can be seen to be taking on a much more clear look.

4. Finally lower the speed to slow or medium (900 - 1200rpm) > this is where the finishing takes place. When the residue is going clear, the abrasive left in the polish are very fine - like having a finishing polish. Working these remaining abrasives at slow speeds refines your finish, removes any light holograms that may be in the finish from the cutting stage and just adds a little bit of crystal clarity to the finish. After these passes, the residue can be seen to be clear, if any wipe it with clean microfiber cloth.

Kindly note: speed depends upon polishes, amount of cut required, thickness of paint, pad aggressiveness and etc. Its better to start from low speed and rise it as required or if required.

Common mistakes

* Incomplete Polish breakdown. The overriding principle to create a great finish is to break the polish down fully. By not breaking it down fully you may scour the surface of the paint imparting defects. Knowing when a polish is fully broken down comes with experience but a good yard stick is when the polish has gone clear and is very easy to wipe off. Ensure any unbroken polish pushed to the outer edges of your work area are not picked up by the pad in the final pass as this will not break down the polish imparting holograms.

* Swirls are imparted by using too harsh a polish that is not broken down properly. If this happens you may have used too much polish or it may have dried. If this happens try removing the polish residue from the panel, spritz the pad with QD only (no more polish) and polish again using the remnants of the polish left in the pad to break it down properly.

* Holograms or micro marring are again imparted due to polish that hasn’t been properly broken down or too high speeds. Following the advice above or below should cure these.

* Buffer hop is when the rotary jumps across the paints surface usually due to insufficient polish/lubrication and as the foam pad ‘bites’ the paint it jumps! Try spreading the polish more evenly across the pad, add more polish or QD.

* Splatter: Ok not always a mistake as techniques including slow cut with consumer intensive polish and some polishes like G3 requires a hefty splash of water/QD. However when using highly lubricated polishes from Meguiars and Menzerna, splatter is a sign that you’ve used too much polish or you have cranked the speed up to too fast, too soon!

Continued on next post.....​
 
Last edited:
Thread Starter #14
Joined
Oct 12, 2012
Messages
1,166
Likes
1,330
Location
Hubli
LITTLE ABOUT BACKING PLATES AND POLISHING PADS​

Backing plates - is a little piece that threads onto a buffer or polisher and gives the pad something to stick to. Perhaps the most obvious aspect of pad & backing plate pairing is size. You obviously do not want a backing plate to be the same diameter as the pad because that would expose the edge of the backing plate, with potential disastrous results. For more info about backing plates, click here.

Polishing pads - Rotary polishers can be used with both foam and wool pads. It is strongly recommended that for starting out with a rotary, wool pads are avoided owing to the high levels of cut they deliver.

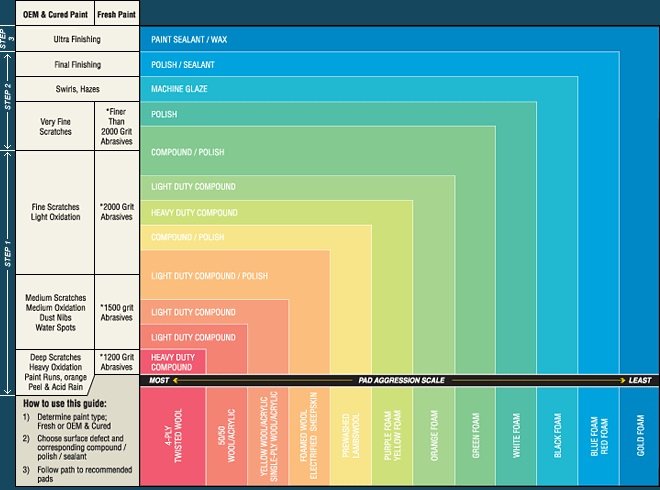
Foam pads for use with rotary polishers come in a wide variety of grades and styles with sizes ranging from 4” right through to 8” diameter. Different pads use different grades of foam which affects the coarseness and hardness of the pad. This in turn varies the amount of cut a pad will deliver, and affect its abilities when finishing. It is a good idea when choosing a selection of pads to use with your rotary to choose a wide selection of grades of foam. This will give you a good choice to tackle everything from severe swirls and marring with compounds, to burnishing a finish to a high gloss with a finessing polish.

Below is the application guide from lake country. First determine the type of paint you are buffing. Second, determine the type of defect you are trying to resolve. Lastly, follow the lines to get the correct pad to correct the defect. For more details click here.

LC_Application_Guide.jpg

LITTLE ABOUT CAR CARE PRODUCTS​

This topic is vast so I could not go though it here but I have found some nice articles where you can understand thoroughly. Link 1 & Link 2

LITTLE ABOUT REMOVING PAINT​

Not everybody want to remove precious paint from their car's finish. However, sometimes removing paint is necessary in order to create a high gloss, defect-free finish. Example: If you have a scratch in your car's finish, say someone keyed your car, or a cat jumped up on the hood and left behind claw scratches. From a horizontal point of view, these scratches would look like this:

Paint_Scratches.jpg

In order to remove these scratches, you will need to remove enough paint surrounding the scratches in order to make the surface level. As you can see in this example, removing the scratches will require removing quite a bit of paint material, and in the case of the deep key scratch (where the arrow is pointing), you will not be able to completely remove it without exposing the base, or color coat of paint. This is a situation where you are better off improving the scratch, not completely removing the scratch.

LITTLE ABOUT HOP​

A few reasons why foam pads hop when using rotary:

1. Foam pads are squishy, and have a natural tendency to rebound.
All those tiny air pockets purposely designed into the pad allow compression and rebound (If you squeeze the pad between your fingers, it'll try to return to its natural shape).

When the pad is placed on the paint surface and the buffer is throttled, the foam pad twists against the paint initially. Once it planes, it returns to its natural shape (close to it, anyway). The amount of pressure you are applying to the buffer also determines the amount of distortion the pad will encounter. Push hard, and the pad flattens. Of course, it wants to rebound to its natural shape.

Therefore, a foam pad needs something to control its rebound (Just as a car needs shock absorbers to control suspension springs). Effectively, YOU become the shock absorber. You must learn the amount of pressure needed to keep the pad shape consistent. If bouncing does occur, you'll have to lift up on the buffer (to reduce pressure momentarily), or change the angle of attack.

For more info: please read post #7.


FEW MORE IMPORTANT ARTICLES​

Machine Polishing by Rotary Polisher - Full Guide
Rotary Buffing Techniques - How Variables Impact Results
Things to keep in mind when getting started with a rotary buffer
How can I avoid Rotary Buffer Swirls/holograms
Hologram Free with a Rotary Buffer
How to Test for Single Stage or Clear Coat Paint
Exhaustive Guide: Car Detailing Basics

CREDITS CANNOT BE MISSED​

Thanks to Mike Phillips, Dave KG, Brazo for guiding us about rotary, pads, products and etc.
Thanks to Kevin Brown for explanations about rotary hop.
Thanks to Dr MUDHAN for detailed guide on Car Detailing Basics.
Also thanks to Autogeek, Meguiars, Detailingworld uk and TheAutomotiveIndia forums.

-----------------------------------------------------------------------------------------------------------------------​


Enjoy detailing your car [cheers]
 
Last edited:

Dr MUDHAN

Honoured Member
Joined
Sep 3, 2013
Messages
925
Likes
2,339
Location
Coimbatore
.
Excellent article and efforts CRACING!

This one about car polishers, I wanted to do some research and write something after on my personal use and observations. I would give this link in our thread: http://www.theautomotiveindia.com/f...83-exhaustive-guide-car-detailing-basics.html

Some observations/ suggestion/ clarification from my side:

1. You have quoted
‘Actually I'm a fan of Black + Decker and have plenty of woodworking power tools of that brand but they don't make car polishers’
But, I find it one B&D model is available @Rs.3500/- in India (KP1200 Car Polisher). It has different handle, Disc Diameter10" but no speed regulator. What is your opinion? Shall we go for the 6” model Black n Decker KP600 60W?

2. You have put the pictures of Skil 9080 Car Polisher parts. Please tag/identify the name of parts so that anybody can understand what are what and understand the use and explanation from your beautiful article.

3. I understand different pads are used for different purpose -Ultra-Light Finishing – Finishing -Light Polishing/Finishing - Light-Medium Polishing- Heavy Polishing- Medium-Heavy Cutting- Heavy Cutting. Is Foam sponge OK up to Light-Medium Polishing?

4. What backing plate size you prefer for people like us? Smaller is better? Whether it comes with interchangeable sizes?

5. Finally , thanks for everything and acknowledging my thread: http://www.theautomotiveindia.com/f...83-exhaustive-guide-car-detailing-basics.html


Some bonus videos!

https://www.youtube.com/watch?v=Koa8rPQS08k

https://www.youtube.com/watch?v=pCf0zUHYW_M&feature=youtu.be

https://www.youtube.com/watch?v=5SOeE0h_6Ms
 
Top Bottom