Retrofitted MGP Clarion Head Unit in Maruti Suzuki Ignis Delta


Thread Starter #1
Joined
Jan 24, 2013
Messages
21
Likes
23
Location
malappuram,kerala
In this detailed article, I'll walk you through my journey of installing a Maruti OE Clarion head unit into my Ignis Delta, which originally came equipped with a basic system supporting calling, USB, and CD functionalities.
Initially, my plan was to upgrade to the 7-inch Maruti OE Harman head unit found in the Ignis Zeta and Alpha models. However, having experienced issues with this unit in my friend's S-Cross—frequent hang-ups and stuttering—I decided to explore other options. While I'm not particularly fond of Android head units either, a knowledgeable friend at Maruti recommended the Clarion 7-inch head unit. Not only does it support wireless Android Auto and CarPlay, but its touch response surpasses that of the Harman system.

Purchasing a brand-new unit wasn't feasible for me, given its hefty price tag of 42k. Fortunately, luck was on my side when I stumbled upon a three-month-old Clarion head unit on Facebook Marketplace. It was listed by someone who had upgraded their Ignis Delta Plus to a 360 Android unit.

However, transitioning from the Harman to the Clarion unit posed a challenge due to the differing plug connections. To address this, I needed a connector coupler harness to convert my car's Harman-compatible harness to one compatible with Clarion. While commercial options like the one from kwidcarsolutions.com were available, priced at 4000, I opted for a more cost-effective DIY approach.

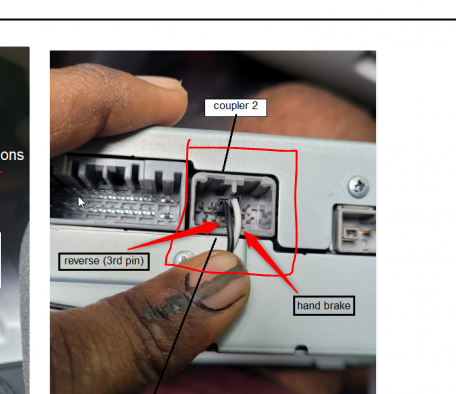
With the assistance of my Maruti friend, I obtained one side of the plug connection. For the other side, I sourced a harness (Baleno Screen Activator) from wavehertz.com, costing Rs. 1300. By utilizing these two couplers, I constructed a conversion coupler. Detailed pin configurations will be provided in the attached photos for your reference.

During the installation process, I had to drill holes into the current frame to align with the stereo screws. Although the fit is now snug, I might consider ordering a new frame in the future, once the part number becomes available and accessible. Additionally, you may need to procure the Fronx Delta Plus GPS module (3A500M74T00). To connect the microphone, I utilized a breadboard pin. For a more comprehensive understanding, please refer to the attached images.

I'll keep you updated on any further developments, including ordering the frame. Stay tuned!

clarion 2.png


clarion.png


frame.jpg


IMG-20240501-WA0119(1).jpg
 
Thread Starter #2
Joined
Jan 24, 2013
Messages
21
Likes
23
Location
malappuram,kerala
I have a small update regarding the parts for this project. I managed to get the correct part numbers for the clamps and had them delivered from boodmo.com at RS 48 each. The part numbers are 39321M66R10 and 39322M66R10.
Currently, I haven't connected the GPS antenna, but surprisingly, Google Maps is still showing accurate directions. I may order the GPS antenna soon, and the part number for it is 39950M84T00 (RS 695).
 
Joined
Sep 17, 2024
Messages
1
Likes
1
Location
TVM
Hi,
Thank you for sharing this information, I tried to install Clarion stereo in my 3rd Gen (2020 model) Swift base model. Stereo is working, but warnings like door open, low fuel, hand break and average fuel are not showing.I am not sure that wiring for these information ware available in coupler of base model swift (2020).
1726551080517.png

Could you please share the remaining pin details of this highlighted port.

After all, I would like to thank you on behalf of all automotive freaks. Really appreciate your effort for documenting and sharing this valuable information.
 
Thread Starter #4
Joined
Jan 24, 2013
Messages
21
Likes
23
Location
malappuram,kerala
Hi,
Thank you for sharing this information, I tried to install Clarion stereo in my 3rd Gen (2020 model) Swift base model. Stereo is working, but warnings like door open, low fuel, hand break and average fuel are not showing.I am not sure that wiring for these information ware available in coupler of base model swift (2020).
View attachment 321020

Could you please share the remaining pin details of this highlighted port.

After all, I would like to thank you on behalf of all automotive freaks. Really appreciate your effort for documenting and sharing this valuable information.
I believe this head unit may not support such warning messages, as it doesn't seem to be coded for it. A friend of mine installed the same head unit in his Ignis Zeta, and he no longer receives those messages, which were previously available on the Harman head unit that came with his vehicle. (vehicle specific)
 
Joined
Apr 5, 2020
Messages
3
Likes
0
Location
India
For a more comprehensive understanding, please refer to the attached images.

View attachment 318787
Hello, thanks for the information. Your posts is really helpful and interesting more.
Have you installed Front camera?
Can you please provide more info on the pins of this Reverse/Front Trigger connector?
You have already identified the Black and White pin which are related to the reverse camera.
I am suspecting that there must be a Front Camera Trigger pin among the remaining pins of the said connector.
 
Joined
Oct 8, 2024
Messages
1
Likes
0
Location
Delhi
Hi, I have also installed this infotainment system via car accessory guy and he made a separate coupler for this.
However his solution is not perfect and has two problem
1. A separate mic is added with additional wire
2. Display's day/night mode does not change with headlight control

Issue 1 is fixed with separate mic but what about your solution for second issue?
 
Joined
Jun 24, 2024
Messages
1
Likes
0
Location
Bathinda
In this detailed article, I'll walk you through my journey of installing a Maruti OE Clarion head unit into my Ignis Delta, which originally came equipped with a basic system supporting calling, USB, and CD functionalities.
Initially, my plan was to upgrade to the 7-inch Maruti OE Harman head unit found in the Ignis Zeta and Alpha models. However, having experienced issues with this unit in my friend's S-Cross—frequent hang-ups and stuttering—I decided to explore other options. While I'm not particularly fond of Android head units either, a knowledgeable friend at Maruti recommended the Clarion 7-inch head unit. Not only does it support wireless Android Auto and CarPlay, but its touch response surpasses that of the Harman system.

Purchasing a brand-new unit wasn't feasible for me, given its hefty price tag of 42k. Fortunately, luck was on my side when I stumbled upon a three-month-old Clarion head unit on Facebook Marketplace. It was listed by someone who had upgraded their Ignis Delta Plus to a 360 Android unit.

However, transitioning from the Harman to the Clarion unit posed a challenge due to the differing plug connections. To address this, I needed a connector coupler harness to convert my car's Harman-compatible harness to one compatible with Clarion. While commercial options like the one from kwidcarsolutions.com were available, priced at 4000, I opted for a more cost-effective DIY approach.

With the assistance of my Maruti friend, I obtained one side of the plug connection. For the other side, I sourced a harness (Baleno Screen Activator) from wavehertz.com, costing Rs. 1300. By utilizing these two couplers, I constructed a conversion coupler. Detailed pin configurations will be provided in the attached photos for your reference.

During the installation process, I had to drill holes into the current frame to align with the stereo screws. Although the fit is now snug, I might consider ordering a new frame in the future, once the part number becomes available and accessible. Additionally, you may need to procure the Fronx Delta Plus GPS module (3A500M74T00). To connect the microphone, I utilized a breadboard pin. For a more comprehensive understanding, please refer to the attached images.

I'll keep you updated on any further developments, including ordering the frame. Stay tuned!

View attachment 318784

View attachment 318785

View attachment 318786

View attachment 318787
Hello sir,
Thank you so much for the information. Do you have any idea about geeting vehicle alerts in clarion. Whether you are getting all this in your clarion stereo after changing it from harman. I installed clarion smartplay pro plus in my grand vitara sigma. What can be done? It was showing with harman but not with clarion.
 
Thread Starter #8
Joined
Jan 24, 2013
Messages
21
Likes
23
Location
malappuram,kerala
In this detailed article, I'll walk you through my journey of installing a Maruti OE Clarion head unit into my Ignis Delta, which originally came equipped with a basic system supporting calling, USB, and CD functionalities.
Initially, my plan was to upgrade to the 7-inch Maruti OE Harman head unit found in the Ignis Zeta and Alpha models. However, having experienced issues with this unit in my friend's S-Cross—frequent hang-ups and stuttering—I decided to explore other options. While I'm not particularly fond of Android head units either, a knowledgeable friend at Maruti recommended the Clarion 7-inch head unit. Not only does it support wireless Android Auto and CarPlay, but its touch response surpasses that of the Harman system.

Purchasing a brand-new unit wasn't feasible for me, given its hefty price tag of 42k. Fortunately, luck was on my side when I stumbled upon a three-month-old Clarion head unit on Facebook Marketplace. It was listed by someone who had upgraded their Ignis Delta Plus to a 360 Android unit.

However, transitioning from the Harman to the Clarion unit posed a challenge due to the differing plug connections. To address this, I needed a connector coupler harness to convert my car's Harman-compatible harness to one compatible with Clarion. While commercial options like the one from kwidcarsolutions.com were available, priced at 4000, I opted for a more cost-effective DIY approach.

With the assistance of my Maruti friend, I obtained one side of the plug connection. For the other side, I sourced a harness (Baleno Screen Activator) from wavehertz.com, costing Rs. 1300. By utilizing these two couplers, I constructed a conversion coupler. Detailed pin configurations will be provided in the attached photos for your reference.

During the installation process, I had to drill holes into the current frame to align with the stereo screws. Although the fit is now snug, I might consider ordering a new frame in the future, once the part number becomes available and accessible. Additionally, you may need to procure the Fronx Delta Plus GPS module (3A500M74T00). To connect the microphone, I utilized a breadboard pin. For a more comprehensive understanding, please refer to the attached images.

I'll keep you updated on any further developments, including ordering the frame. Stay tuned!

View attachment 318784

View attachment 318785

View attachment 318786

View attachment 318787
Update:
After thorough research, I’ve managed to source all the couplers needed to make this wiring harness professional. This includes two harnesses: the main harness and a smaller two-wire harness for incorporating the reverse trigger wire (for camera activation) and the handbrake sensing wire.

Additionally, I can offer this at a much more reasonable price compared to the
20241222_082551.jpg
20241231_063816.jpg
20241231_063816.jpg
kwid Car Solutions website mentioned in the post. Feel free to contact me at 9746315329.

I’m attaching a photo of the couplers below.

Hi, I have also installed this infotainment system via car accessory guy and he made a separate coupler for this.
However his solution is not perfect and has two problem
1. A separate mic is added with additional wire
2. Display's day/night mode does not change with headlight control

Issue 1 is fixed with separate mic but what about your solution for second issue?
if you follow the pin configurations correctly then this problem won't occur.
 
Top Bottom