Thread Starter
#1
Finally managed to get the Maruti Ritz tachometer fitted onto my Wangon R 2007 Lxi Duo. The meter works like a charm . I followed all the connections as per this blog( http://www.theautomotiveindia.com/forums/do-yourself/7572-tachometer-install-maruti-zen-estilo.html ). To simplify them , they are (Connections -- Red from tacho - To ACC positive, Black - To Negative, Yellow with white stripes - Tacho signal (connect to brown wire behind dash, Yellow with blue stripe - Bakclit).
The only problem i faced during the wiring was for the backlit. The meter workd fine with the back light on with the ignition but when I put the parking lights on, the backlight of the tacho would go off. After alot of brain storming with my mechanic he finally found an extra negative terminal inside the dash and connected the backlight to that (as per what he says). The back light now remains on all through out and I personally had no issues with that fact. The image shows the brown wire which severs as the Tacho signal for the meter.


Coming to the mounting mechanism for the Tacho. Hats off to my mechanic for that job as well.![Cheers [cheers] [cheers]](https://www.theautomotiveindia.com/forums/images/smilies/Cheers.gif) First we held the tacho up-right and marked the position and made two very fine, neat cuts to use the side clamps at the base of the tacho. We cut the long pillars which were made on the tacho to extend into the dash as well. Between the two cuts we made, we also made a hole in the center for all the wires to go through.
First we held the tacho up-right and marked the position and made two very fine, neat cuts to use the side clamps at the base of the tacho. We cut the long pillars which were made on the tacho to extend into the dash as well. Between the two cuts we made, we also made a hole in the center for all the wires to go through.
Using only the side clamps under the tacho made the job simpler. The tacho fits as if it were made for that car itself or possibly company fitted. It fits perfectly tight and does not rattle on the dashboard no matter what. Keep in mind not to make the cuts on the dash too large orelse the meter would not fit too well. Looks amazing on the dash. Makes my baby reli gorgeous inside and adds a new spark to it. Finaly also attached a pic of my baby revving at 4000 RPM![Clap [clap] [clap]](https://www.theautomotiveindia.com/forums/images/smilies/Clap.gif) .
.
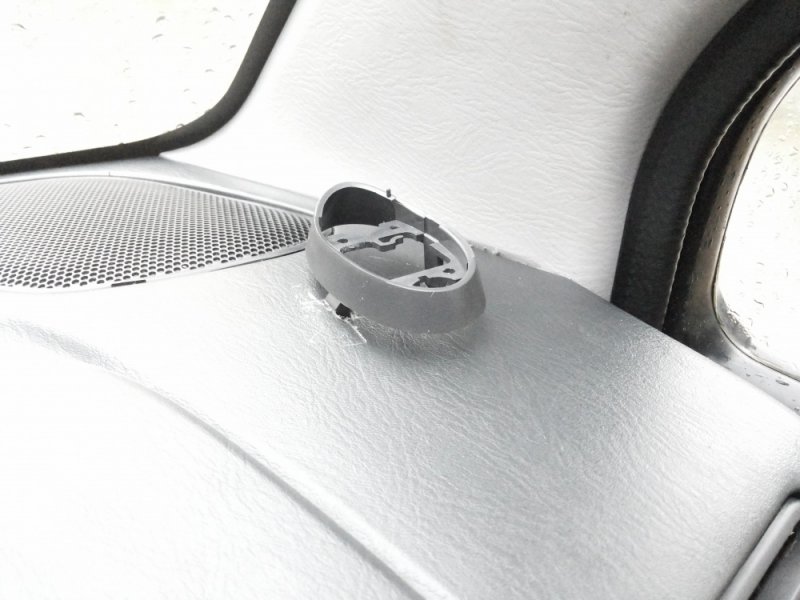


The only problem i faced during the wiring was for the backlit. The meter workd fine with the back light on with the ignition but when I put the parking lights on, the backlight of the tacho would go off. After alot of brain storming with my mechanic he finally found an extra negative terminal inside the dash and connected the backlight to that (as per what he says). The back light now remains on all through out and I personally had no issues with that fact. The image shows the brown wire which severs as the Tacho signal for the meter.


Coming to the mounting mechanism for the Tacho. Hats off to my mechanic for that job as well.
![Cheers [cheers] [cheers]](https://www.theautomotiveindia.com/forums/images/smilies/Cheers.gif) First we held the tacho up-right and marked the position and made two very fine, neat cuts to use the side clamps at the base of the tacho. We cut the long pillars which were made on the tacho to extend into the dash as well. Between the two cuts we made, we also made a hole in the center for all the wires to go through.
First we held the tacho up-right and marked the position and made two very fine, neat cuts to use the side clamps at the base of the tacho. We cut the long pillars which were made on the tacho to extend into the dash as well. Between the two cuts we made, we also made a hole in the center for all the wires to go through. Using only the side clamps under the tacho made the job simpler. The tacho fits as if it were made for that car itself or possibly company fitted. It fits perfectly tight and does not rattle on the dashboard no matter what. Keep in mind not to make the cuts on the dash too large orelse the meter would not fit too well. Looks amazing on the dash. Makes my baby reli gorgeous inside and adds a new spark to it. Finaly also attached a pic of my baby revving at 4000 RPM
![Clap [clap] [clap]](https://www.theautomotiveindia.com/forums/images/smilies/Clap.gif) .
.


![Smile [:)] [:)]](https://www.theautomotiveindia.com/forums/images/smilies/Smile.gif)
![Frustration [frustration] [frustration]](https://www.theautomotiveindia.com/forums/images/smilies/Frustration.gif) but time should heal all. Starting with the looks of it, its quite moderately sized, not too large nor too small. Should fit well on most cars. Comes with screws in the box, but u might fall short of a pair or so. Just buy some from the hardware shop in such a case.
but time should heal all. Starting with the looks of it, its quite moderately sized, not too large nor too small. Should fit well on most cars. Comes with screws in the box, but u might fall short of a pair or so. Just buy some from the hardware shop in such a case.




![Thumbs Up [thumbsup] [thumbsup]](https://www.theautomotiveindia.com/forums/images/smilies/Thumbs%20Up.png)