My New Honda City in White - The Albus


Joined
Apr 9, 2014
Messages
39
Likes
33
Location
Bangalore
It gives me a pleasant surprise to see my thread highlighted in front page theme of our TAI forum and the comments describing it.
I am thankful to our Moderators for the way they have the reflected their appreciation over my efforts.
I was actually wondering sometime earlier that when the forum would recognize me a professional as I continue to be quoted only as an amateur in spite of my extra ordinary threads and hundreds of postings.
This recognition makes my work ever so much more enjoyable and challenging.
Thanks to everyone who are behind my efforts.
With warm regards,
Dr MUDHAN

My dear Dr,

Everytime I wanted to visit Disneyland, I would visit a few auto blogs till I discovered there was Hogwarts and ever since at least once a week I would peek in to savour and enjoy your blog.

The small little things that make this blog so unique yet grounded Eg The sticker on the mag wheel- I feel that's magic.
What causes me to actually write in again is the fact that it never struck me to even look at what your profile states. 'amateur' is ridiculous and I ask many others who visit Hogwarts to request the moderators to allow our 'Dumbledore' be promoted to 'Professional'

Dr Mudhan - Professional
 
Thread Starter #632

Dr MUDHAN

Honoured Member
Joined
Sep 3, 2013
Messages
925
Likes
2,339
Location
Coimbatore
@ CRACING
As usual every way you are strengthening our thread. You really come forward every time to add value, for which I am grateful to you, and thanks your contribution towards car specific reverse camera designs.

@ 350Z
Thanks for your endearing words and for those encouraging comments and response.

@ Mr.Swamy

My dear Mr.Swamy
Thanks for your beautiful words which betokens your broad, generous heart!
I owe a special debt of gratitude to you for your extraordinary feelings towards me and one can be enormously grateful for this kind of support – it works on a subtle level and strengthens where it is most valuable .
Please, also see the first page of this thread once again.

With warm regards
Dr MUDHAN
 
Last edited:
Thread Starter #633

Dr MUDHAN

Honoured Member
Joined
Sep 3, 2013
Messages
925
Likes
2,339
Location
Coimbatore
PART: LI:

MY ALBUS: GOT THE RIGHT REAR LICENSE PLATE BULBS


honda city 01.jpg


honda city.jpg


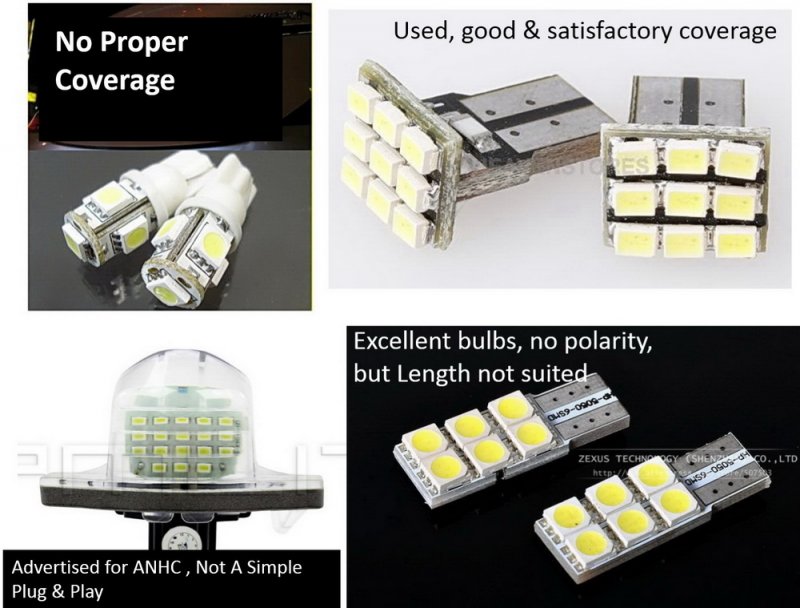
I had to spend some money over choosing the right and satisfactory LED bulb for my ALBUS rear license plate. The design of lamp housing in ANHC (3RD GEN) is little different from other cars and a bulb should illuminate down to focus the number plate and choosing a right bulb was challenging to me. The one advertised for ANHC is not a simple plug and play.

I have really wasted some money while trying various shapes of bulbs and finally satisfied with a one.

My preference was a bulb bright enough to cover the area beautifully but at the same time, I did not want over bright, flooding illumination which would cover the rear area like a reverse lamp.
There should not be a polarity issue which is common in standard LED bulbs, which will not be useful if it only works one side, as it should work reverse upside down.
I wanted a real white almost and not the white with blue tint.

After trying various bulbs, now I have settled down with this new generation, no polarity, excellent quality bulb, which I feel is the best out of all those I used earlier and suits to my preference. It’s really cheap too!

Only thing, the length is just one thread more, but no issue, you just elevate little upwards, it will fit in and that’s all.

Free Shipping 2pcs/lot T10 4 SMD LED 5050 Car Auto Canbus Wedge Turn Signals Light Lamp Bulb White-in Light Source from Automobiles & Motorcycles on Aliexpress.com


THE BULBS WHICH I TRIED​

120140616_062932.jpg

NOTE: BULBS ARE NOT FOCUSED DOWNWARDS!

120140616_063340.jpg
ANHC.jpg
 
Thread Starter #634

Dr MUDHAN

Honoured Member
Joined
Sep 3, 2013
Messages
925
Likes
2,339
Location
Coimbatore
PART: LII
ANHC : CHANGING THE GEAR SHIFT BOOT​

@Dr MUDHAN Sir, I need a little guide on gear swift cover aka swift boot (MT) because the stock one on my car has worn now and wanted to replace.
Regarding where to buy (India or China) and are they vehicle specific. There are some universals in aliexpress but not specific to ANHC.
As well as how to remove and install it since I don't wanna break something without knowing how to remove it. Thanks... Best Regards

CRACING, I tried all my best to give you a pictorial guidance. I couldn’t make one exclusively for our ANHC. However, from professional guidance and from the best sources available on internet, I gathered these information, which you may try carefully and document it if possible.

What we will need: 1 Philips screwdriver, 1 pry tool or 1 flat head screwdriver &1 shift boot cover.

The steps to follow:

1) Unscrew the shift knob and keep them aside.
2) Push the boot down into the center console and, by using pry tool or flat head screwdriver (Be careful not to scratch and use a cloth over tip if it is screw driver) grab the inside rim of the silver trim piece of the center console and pull up evenly on both sides & rear. It should pop right off & remove it from rear. ( I feel, better to check up any more screws in the front where the silver rim connecting with dash console on both the sides.)
3) There are screws / staples holding the boot to the silver trim piece. Remove the torx screws and pull the boot and ring out through the bottom.
4) The boot is secured to the ring with staples. Remove them with a pair of needle nose pliers.
5) Flip the old boot inside-out and use a pair of cutting pliers to cut the zip tie holding the plastic ring to the boot. (If you need this ring for the new boot)
6) Flip the new boot inside-out and replace with the ring and secure with a new zip tie.
7) Depending on the size of the boot cover we use, whether a DC2 Type R shift boot which is quite a bit larger than the Si boot, we have to trim off the excess boot material & secure.
8) Pull the boot through the silver trim piece and put the ring back in place & screw the torx screws right through the boot to hold it in place.
9) Snap the silver trim piece back in place in the console.
10) Screw the gear knob back on, making sure to line up the shift pattern.

All the very best.

I give you some reference sites for HONDA cars which might help you:

photo4.jpg


Remove Leather Shift Boot? - LotusTalk - The Lotus Cars Community

For Spoon Sports Gear Shift Knob Cover Leather Gaiter Sleeve Glove Collars Universal For Honda DC5 CRV JAZZ CITY ACCORD-in Gear Shift Collars from Automobiles & Motorcycles on Aliexpress.com

Changing the leather bit around the gear stick - HondaSUV Forums - Discussion forum and bulletin board for Honda CR-V, CRV, Element, Pilot, HR-V owners
 
Joined
Oct 12, 2012
Messages
1,166
Likes
1,330
Location
Hubli
CHANGING THE GEAR SHIFT BOOT​

CRACING, I tried all my best to give you a pictorial guidance.......

2) Push the boot down into the center console and, by using pry tool or flat head screwdriver (Be careful not to scratch and use a cloth over tip if it is screw driver) grab the inside rim of the silver trim piece of the center console and pull up evenly on both sides & rear. It should pop right off & remove it from rear. ( I feel, better to check up any more screws in the front where the silver rim connecting with dash console on both the sides.)
Thats more then enough and looks simple. Thanks for the guide. [:)]

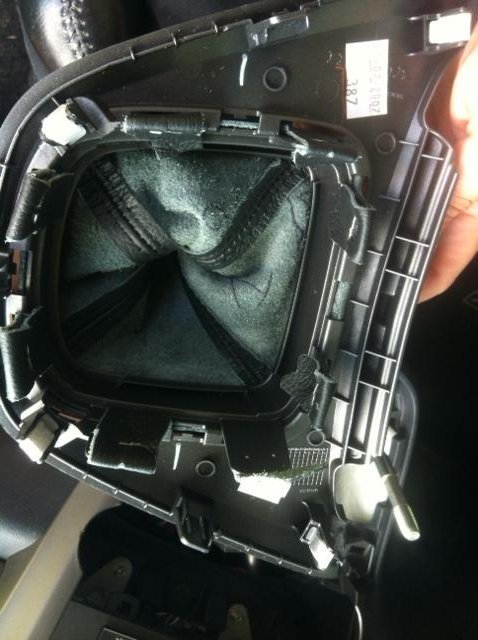
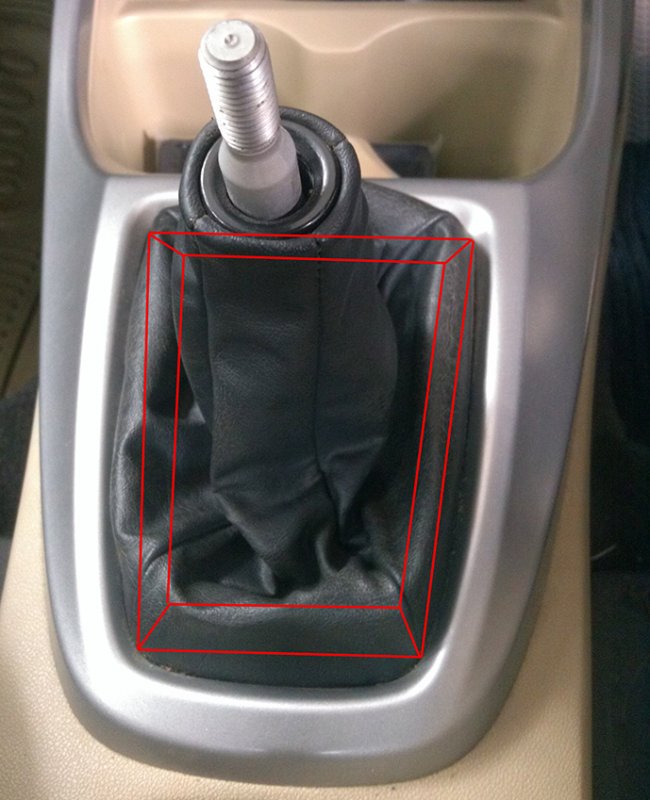
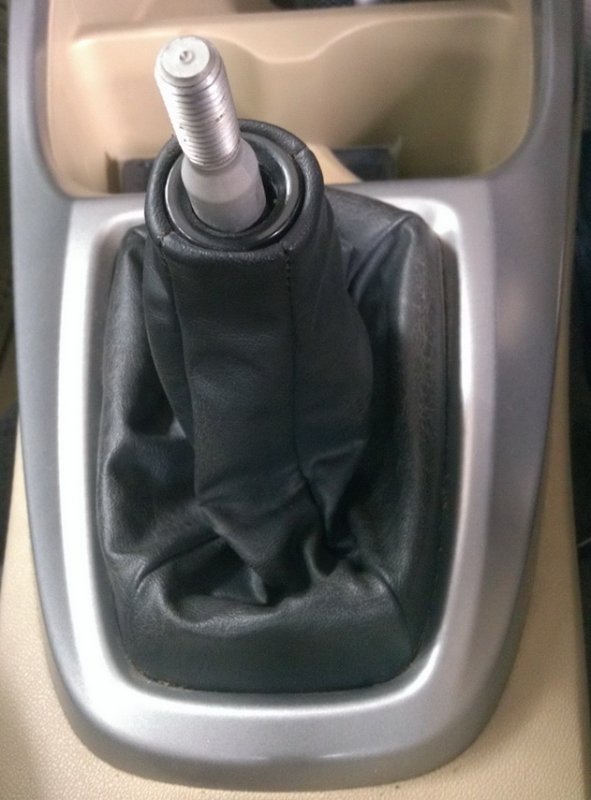
However, its seems not possible for me to remove the plastic rim inside the sliver trim. I have not used any pry tool but tried to pull by hand. Do you mean to pull the following plastic rim inside the sliver trim to outside?

CameraZOOM-20140713143424504.jpg

or I'm doing it wrong? sorry if so.

Thanks again...
Best Regards
 
Last edited:
Joined
Oct 12, 2012
Messages
1,166
Likes
1,330
Location
Hubli
Changing The Gear Shift boot - Pictures

Finally I was able to do it. Actually the whole sliver trim should be removed like you said but I was trying to remove plastic rim inside the sliver trim. However, I had doubt so didn't tried hard in the wrong way.

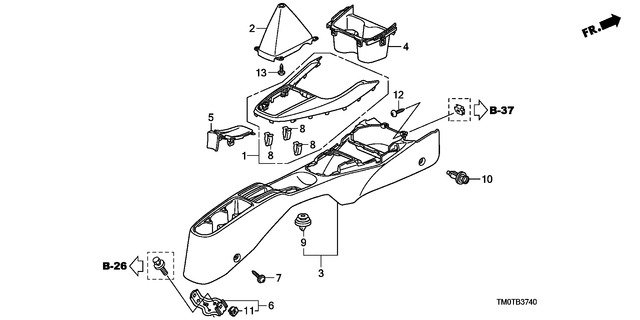
I hearty appreciate Honda and Lings Honda Parts for providing diagram based pictures for each and every parts on Honda City as well as most of other Honda Cars. Not all cars get such a rarest thing to public so we are lucky. Its very helpful to understand how to disassemble and reassemble many different parts.

Here you go:

Honda_City_Center_Console.jpg
Credits to: Honda and Lings Honda Parts

Disassembling:

CameraZOOM-20140713143424504.jpg CameraZOOM-20140713180646075.jpg
CameraZOOM-20140713180920369.jpg

Reassembling With New Boot (More Info Below):

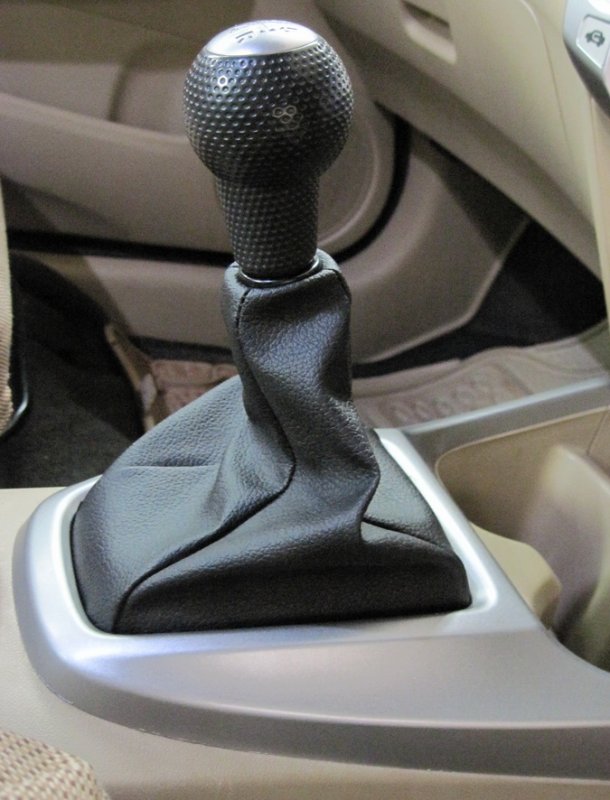
IMG_0204.JPG IMG_0206.JPG
IMG_0207.JPG

End Of Work:

IMG_0209.JPG

You might guess I have bought a new shift boot but actually I stitched it myself. I had some cut pieces of high quality rexine aka artificial leather and I being a car seat cover tailor :tongue:, stitching the shift boot was an easy task. I let it a go and it endup very nice. Saved some bucks! [:D]

Thanks a lot Dr MUDHAN, your guide made me succeed with this DIY...
Best Regards
 
Last edited:
Thread Starter #637

Dr MUDHAN

Honoured Member
Joined
Sep 3, 2013
Messages
925
Likes
2,339
Location
Coimbatore
Great CRACING, you have done it! [clap]

This must be the first DIY documented over this issue, which would be very helpful for our friends who are in search of this information.

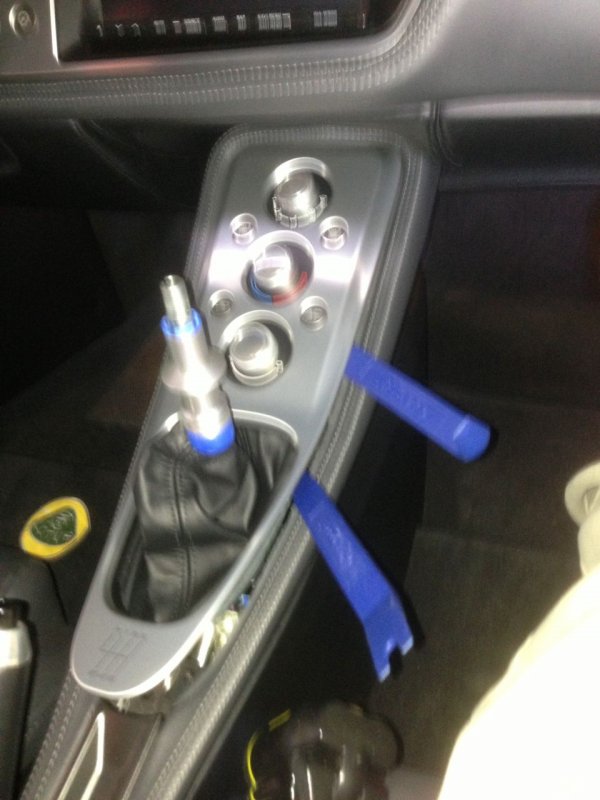
I give below one picture of some other model of a car which may be helpful to know that how one should use the pry tool to push out the silver rim.

259354d1373821091-remove-leather-shift-boot-img_2345.jpg

1.jpg
 
Joined
Oct 12, 2012
Messages
1,166
Likes
1,330
Location
Hubli
PART: LI:

MY ALBUS: GOT THE RIGHT REAR LICENSE PLATE BULBS


I too was more interested to buy and fit these canbus based T10 bulbs into License Plate Lighting because they throw light in the right direction where its required. However, I had doubt whether it will fit because stock bulb sizes approx 26mm in length and these are 28mm. There is hardly a mm more size inside.

Nice to see that it has fitted and brightness is awesome. [:)]

Great CRACING, you have done it! [clap]
Thanks

Yeah, thats what I have done after seeing the Honda's Diagram. Before I was trying to pull a plastic rim thing that is inside sliver trim and boot, just because my old Tata Nano used be like that but I was wrong. Sliver trim has to be removed first in Honda City.

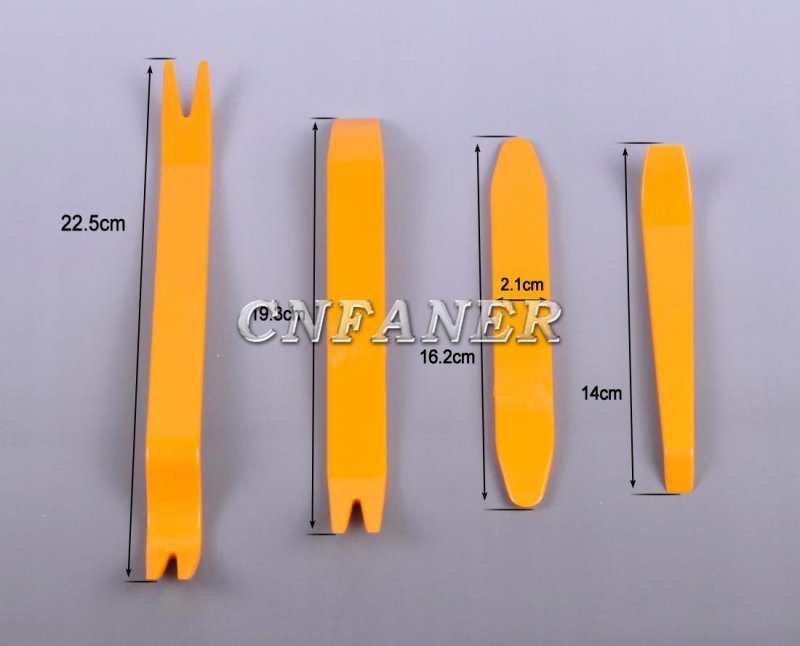
I used a ply tool made for mobile disassembling but will be buying those 4 in 1 multi purpose ply tools soon. However, its impossible to prevent scraping of edges (yet its in nano-meter) when disassembling these pop off trims. [frustration] Screw fitted trims are much better, even though they may look little ulgy.​
 
Last edited:
Joined
Feb 27, 2013
Messages
3,779
Likes
1,335
Location
Bangalore
Dr Mudhan, your thread is very informative. An encyclopedia for Honda City.

Where do we find those T-shaped LED bulbs for number plate online ? Any specific links ?
 
Joined
Oct 12, 2012
Messages
1,166
Likes
1,330
Location
Hubli
Thread Starter #642

Dr MUDHAN

Honoured Member
Joined
Sep 3, 2013
Messages
925
Likes
2,339
Location
Coimbatore
Last edited:
Joined
Apr 9, 2014
Messages
39
Likes
33
Location
Bangalore
@ Mr.Swamy
Please, also see the first page of this thread once again.

With warm regards
Dr MUDHAN

Dear Dr.
You do me a great honour. I'm so pleased. I'm going to show it to my wife and some of my friends! Thank You!
 
Joined
Oct 12, 2012
Messages
1,166
Likes
1,330
Location
Hubli
How do we pay in Aliexpress, can we use our Indian CC? Will they charge in $ or Rs ?
Hello,

Yes you can use any banks credit cards and amount will be debited instantly on your CC account. Aliexpress, Ebay, Alibaba, DHGate are all safe in transactions so you don't have to worry. Items shipped from China takes 15 to 60 days to reach us, depending upon how fast it passes the gateways (i.e customs). However, Aliexpress & ebay have a timeline of 45 days for the item to reach us, otherwise you have to inform the seller or lodge complaint within that period, if not the online shop will not honor for the lose.

Charges will be in INR on your CC account, at the exchange rates of transaction time. However, a little higher then the actual exchange rate. i.e current exchange rate is 60 INR per USD but Aliexpress or ebay's paypal have an exchange rate of 62 (+/- 1) INR per USD.

Hope you got it. [:)]

Thanks...
Best Regards
 
Last edited:
Top Bottom