Thread Starter
#1
Guys,
Here is my another DIY thread, this time to add USB for Ford Figo Titanium.
Background:
Figo is now available with USB option in OE music player. The same unit was used earlier, but without the USB port. Worst part is, player remained same only the USB port / cable was missed intentionally (to add them during a facelift). Friend of mine had such a Figo and badly needed USB port (playing music through Bluetooth drained the phone battery in no matter of time, and keep burning CDs isn't that practical)
Came across few posts elsewhere about adding USB to Ford Figo OE player and informed him about the same. Then came in mind, Why not try it?
Parts / Equipments required:
1) Ford Figo with OE player
Trust me, without this you can't proceed further. Don't kick me please
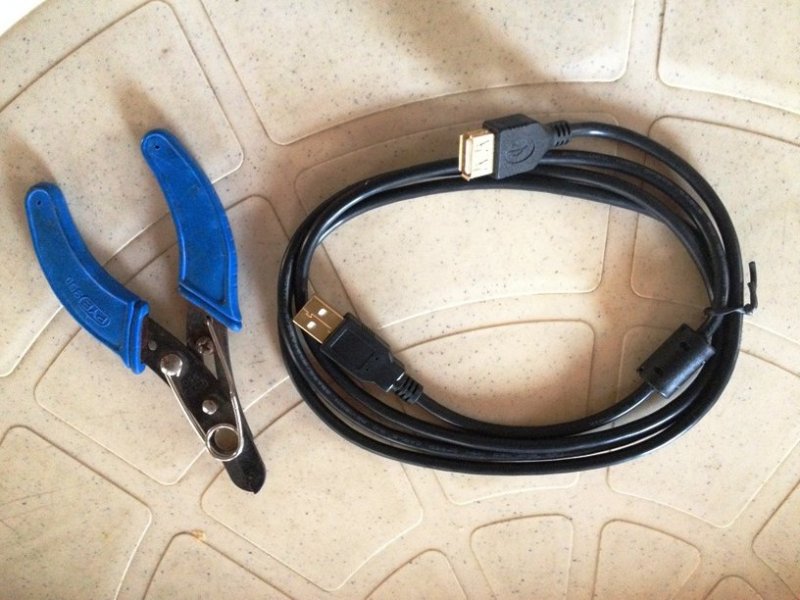
2) U-Clamp
I made it (another DIY) with a pair of bicycle spokes. There are few available in eBay, but with my earlier experience with Fiat Linea I used this jugad one (successfully)
Cost: 4 INR (2 x 2 INR)

3) USB Cable (with female end)
Ask for 1m USB extension cable (don't go for cheaper ones, inner wires will be so thin and they don't last longer. Get a decent one)
Cost: 80 INR
4) Clips (female - push type) (don't know what is it called as)
Taken this snap from Google and with this reference I could get it from a nearby electronics shop. We need 4 such sockets.
Cost: 20 INR (4 x 5 INR)

5) Heat Shrinkable sleeve
I couldn't get heat shrinkable sleeves, so settled for regular sleeves (insulators) Even a insulation tape should do the job pretty well, but a heat shrinkable sleeve will be more professional and long lasting. (image source: google)

6) Other Equipments
- Wire stripper
- Soldering station
- Heater gun (if heat shrinkable sleeve is used)
- Insulation tape (if required)
Procedure
Note: Before starting the process make sure you have the Radio lock code with you (it is mentioned in the owners manual or inside the glove box) Without this you may end up with a locked audio system and you should run to the A.S.S to get the code / unlock the radio.
Before removing the head unit, it is better to prepare the cabling part.
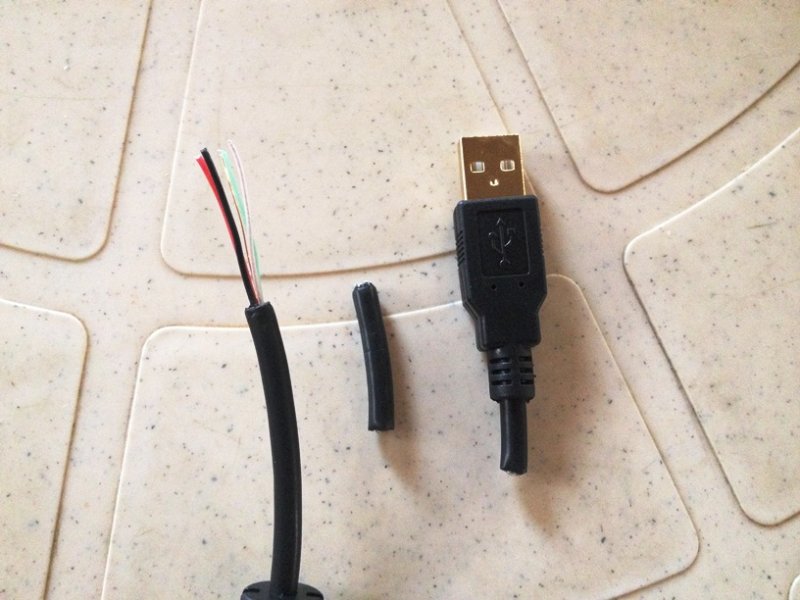
- Cut the Male end of USB cable (make sure twice you cut only the Male end)
- In general USB cable will have the below color coding wires
RED
GREEN
WHITE
BLACK
- Insert the sleeves to each wire
- Now solder & crimp the clips to each wire
- Slide the sleeves to cover the soldered portion and the metal clip
- Use heater gun to shrink the sleeves (if heat shrinkable sleeves are used)
(I forgot to take these snaps![[frustration]](https://www.theautomotiveindia.com/forums/images/smilies/Frustration.gif "Frustration [frustration]") . Realized while creating this thread)
. Realized while creating this thread)
Now the cable part is ready for installation.
- Insert (gently) the U-Clamp into the head unit holes
- You should be able to feel some resistance and after a point it will be easy to get in. Stop it here (or bring back few mm)
- Push both the clamps outwards (LH towards LH & RH towards RH) and gently pull the U-Clamps (simultaneously)
- Head unit should slide outside easily

Now coming to the wiring part
- This is how the head unit rear should look like


- Connect the wires in below order
1 - WHITE
2 - BLACK
4 - RED
6 - GREEN
- Route the USB cable on the rear side and place the female end inside the glove box or near the Cup holders.
- Now you are ready with the USB setup
- Switch on the head unit
- It will ask for the Radio Code
- Use the number keys to enter the code
Example, if the radio code is 2468, Press
"1" key twice
"2" key 4 times
"3" key 6 times
"4" key 8 times
"6" key to confirm
- Connect a USB drive to the cable (make sure you have mp3 songs loaded)
- Press "SRC" (source) button, choose "USB"
- "READING MEMORY" will be displayed in the HU
- Player will start playing the songs from the USB![[clap]](https://www.theautomotiveindia.com/forums/images/smilies/Clap.gif "Clap [clap]")
That's it. Project success.


Here is my another DIY thread, this time to add USB for Ford Figo Titanium.
Background:
Figo is now available with USB option in OE music player. The same unit was used earlier, but without the USB port. Worst part is, player remained same only the USB port / cable was missed intentionally (to add them during a facelift). Friend of mine had such a Figo and badly needed USB port (playing music through Bluetooth drained the phone battery in no matter of time, and keep burning CDs isn't that practical)
Came across few posts elsewhere about adding USB to Ford Figo OE player and informed him about the same. Then came in mind, Why not try it?
Parts / Equipments required:
1) Ford Figo with OE player
Trust me, without this you can't proceed further. Don't kick me please
2) U-Clamp
I made it (another DIY) with a pair of bicycle spokes. There are few available in eBay, but with my earlier experience with Fiat Linea I used this jugad one (successfully)
Cost: 4 INR (2 x 2 INR)
3) USB Cable (with female end)
Ask for 1m USB extension cable (don't go for cheaper ones, inner wires will be so thin and they don't last longer. Get a decent one)
Cost: 80 INR
4) Clips (female - push type) (don't know what is it called as)
Taken this snap from Google and with this reference I could get it from a nearby electronics shop. We need 4 such sockets.
Cost: 20 INR (4 x 5 INR)
5) Heat Shrinkable sleeve
I couldn't get heat shrinkable sleeves, so settled for regular sleeves (insulators) Even a insulation tape should do the job pretty well, but a heat shrinkable sleeve will be more professional and long lasting. (image source: google)
6) Other Equipments
- Wire stripper
- Soldering station
- Heater gun (if heat shrinkable sleeve is used)
- Insulation tape (if required)
Procedure
Note: Before starting the process make sure you have the Radio lock code with you (it is mentioned in the owners manual or inside the glove box) Without this you may end up with a locked audio system and you should run to the A.S.S to get the code / unlock the radio.
Before removing the head unit, it is better to prepare the cabling part.
- Cut the Male end of USB cable (make sure twice you cut only the Male end)
- In general USB cable will have the below color coding wires
RED
GREEN
WHITE
BLACK
- Insert the sleeves to each wire
- Now solder & crimp the clips to each wire
- Slide the sleeves to cover the soldered portion and the metal clip
- Use heater gun to shrink the sleeves (if heat shrinkable sleeves are used)
(I forgot to take these snaps
. Realized while creating this thread)Now the cable part is ready for installation.
- Insert (gently) the U-Clamp into the head unit holes
- You should be able to feel some resistance and after a point it will be easy to get in. Stop it here (or bring back few mm)
- Push both the clamps outwards (LH towards LH & RH towards RH) and gently pull the U-Clamps (simultaneously)
- Head unit should slide outside easily
Now coming to the wiring part
- This is how the head unit rear should look like
- Connect the wires in below order
1 - WHITE
2 - BLACK
4 - RED
6 - GREEN
- Route the USB cable on the rear side and place the female end inside the glove box or near the Cup holders.
- Now you are ready with the USB setup
- Switch on the head unit
- It will ask for the Radio Code
- Use the number keys to enter the code
Example, if the radio code is 2468, Press
"1" key twice
"2" key 4 times
"3" key 6 times
"4" key 8 times
"6" key to confirm
- Connect a USB drive to the cable (make sure you have mp3 songs loaded)
- Press "SRC" (source) button, choose "USB"
- "READING MEMORY" will be displayed in the HU
- Player will start playing the songs from the USB
That's it. Project success.
Last edited:

![[confused]](https://www.theautomotiveindia.com/forums/images/smilies/Confused.gif "Confused [confused]")

